Jensen VM9311TS Instruction Manual - Page 17

System Setup Menu - remote control

Page 17 highlights

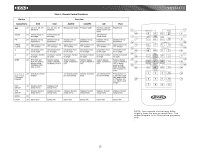
VM9311TS SYSTEM SETUP MENU In "System Setup" mode, "ASP CONFIG", "GENERAL SETUP" and "SCREEN CAL" are available for adjustment. Setup can be performed by pressing the dedicated button on the remote control or by touching the top left corner of the TFT screen. For system settings, press the SYS SETUP button (31) on the remote control or touch "SETUP" on the screen to enter the "SETUP" menu. "SYS SETUP" is highlighted in green. General Setup Menu Accessing the General Setup Menu To access the "GENERAL SETUP" Menu, press the direction buttons on the joystick (16, 17, 18, 19) or remote control (14, 17, 18, 19, 22) to highlight "GENERAL SETUP" in green. DIRECTION BUTTONS Press the >/|| button (18) on the remote control to enter the "GENERAL SETUP" menu. A menu appears with the option for the first item, "Radio", highlighted in light blue. GENERAL SETUP USA BACK Screen Saver Video Format Beep On Selecting a Feature for Adjustment Press the >> or /|| button (18) on the remote or by pressing the ENTER (joystick) button (20) on the unit. A submenu appears in a second row with the selected option highlighted in light blue. 2. Select a new value by pressing the >> or or buttons (16, 17) on the joystick to adjust the hour or minutes. 4. Press the

  • 1
  • 2
  • 3
  • 4
  • 5
  • 6
  • 7
  • 8
  • 9
  • 10
  • 11
  • 12
  • 13
  • 14
  • 15
  • 16
  • 17
  • 18
  • 19
  • 20
  • 21
  • 22
  • 23
  • 24
  • 25
  • 26
  • 27
  • 28
  • 29
  • 30
  • 31
  • 32
  • 33
  • 34
  • 35
  • 36
  • 37
  • 38
  • 39
  • 40
  • 41
  • 42
  • 43
  • 44
  • 45
  • 46
  • 47
  • 48
  • 49
  • 50
  • 51
  • 52
  • 53
  • 54
  • 55
  • 56
  • 57
  • 58
  • 59
  • 60
  • 61
  • 62
  • 63
  • 64
  • 65
  • 66
  • 67
  • 68
  • 69
  • 70
  • 71
  • 72
  • 73
  • 74
  • 75
  • 76
  • 77
  • 78
  • 79
  • 80
  • 81
  • 82
  • 83
  • 84
  • 85
  • 86
  • 87
  • 88
  • 89
  • 90
  • 91
  • 92
  • 93
  • 94
  • 95
  • 96

13
VM9311TS
SYSTEM SETUP MENU
In “System Setup” mode, “ASP CONFIG”, “GENERAL
SETUP” and “SCREEN CAL” are available for adjustment.
Setup can be performed by pressing the dedicated button on
the remote control or by touching the top left corner of the
TFT screen.
For system settings, press the
SYS SETUP
button (31) on
the remote control or touch “SETUP” on the screen to enter
the “SETUP” menu. “SYS SETUP” is highlighted in green.
General Setup Menu
Accessing the General Setup Menu
To access the “GENERAL SETUP” Menu, press the direction
buttons on the joystick (16, 17, 18, 19) or remote control (14,
17, 18, 19, 22) to highlight “GENERAL SETUP” in green.
Press the
>/||
button (18) on the remote control to enter the
“GENERAL SETUP” menu. A menu appears with the option
for the first item, “Radio”, highlighted in light blue.
Selecting a Feature for Adjustment
Press the
>>
or
<<
buttons (14, 22) on the remote control or
the
/\
or
V
buttons (18, 19) on the joystick to select the feature
to be adjusted.
Adjusting a Feature
1.
Enter the option field for the feature you want to adjust
by pressing the
>/||
button (18) on the remote or by
pressing the
ENTER
(joystick) button (20) on the unit. A
submenu appears in a second row with the selected
option highlighted in light blue.
2.
Select a new value by pressing the
>>
or
<<
buttons (14,
22) on the remote control or the
/\
or
V
buttons (18, 19)
on the joystick.
3.
Confirm your selection by pressing the
<<
,
|<<
, or
>>|
buttons (14, 17, 19) on the remote control, or the
<
or
>
button (16, 17) on the joystick. The new value is
highlighted in light blue and setup is complete.
Adjusting the Clock
Method 1 – TFT screen open:
1.
Access the “Clock” setting under the General Setup
menu.
2.
Press the
>>
or
<<
buttons (14, 22) on the remote
control or the
/\
or
V
buttons (18, 19) on the joystick to
move the cursor to the “Hour” or “Min” position.
3.
Press the
|<<
, or
>>|
buttons (17, 19) on the remote
control or the
<
or
>
buttons (16, 17) on the joystick to
adjust the hour or minutes.
4.
Press the
<<
button (14) on the remote control to confirm
setup.
Method 2 – TFT screen closed:
DIRECTION BUTTONS
GENERAL SETUP
USA
Screen Saver
BACK
Video Format
Beep
On
Table 5: General Setup Menu Features
Setting
Options
Function
Radio
USA
AM Frequency Spacing - 10kHz
AM Frequency Band -
530kHz~1720kHz
FM Frequency Spacing - 200kHz
FM Frequency Band -
87.5MHz~107.9MHz
Europe
AM Frequency Spacing - 9kHz
AM Frequency Band -
522kHz~1620kHz
FM Frequency Spacing - 50kHz
FM Frequency Band -
87.5MHz~108.0MHz
South
America 1
AM Frequency Spacing - 10kHz
AM Frequency Band -
530kHz~1720kHz
FM Frequency Spacing - 100kHz
FM Frequency Band -
87.5MHz~108.0MHz
South
America 2
AM Frequency Spacing - 5kHz
AM Frequency Band -
520kHz~1600kHz
FM Frequency Spacing - 100kHz
FM Frequency Band -
87.5MHz~108.0MHz
Arabia
AM Frequency Spacing - 9kHz
AM Frequency Band -
531kHz~1620kHz
FM Frequency Spacing - 100kHz
FM Frequency Band -
87.5MHz~108.0MHz
Korea
AM Frequency Spacing - 9kHz
AM Frequency Band -
531kHz~1602kHz
FM Frequency Spacing - 200kHz
FM Frequency Band -
88.1MHz~107.9MHz
China
AM Frequency Spacing - 9kHz
AM Frequency Band -
522kHz~1620kHz
FM Frequency Spacing - 100kHz
FM Frequency Band -
87.5MHz~108.0MHz
Clock Mode
12H
Clock displays 12 hour time using
AM and PM.
24H
Clock displays 24 hour time up to
23:59.
Screen Saver
On
Turn screen saver on/off.
Off
Video Format
(Input cir-
cuitry auto-
detects the
video signal
from the Aux
In source).
Auto
The color signal output is switched
automatically based on the current
video input signal - NTSC or PAL.
NTSC
The color signals are output in the
standard NTSC format.
PAL
The color signals are output in the
standard PAL format.
TFT Auto
Open
On
The TFT panel automatically opens
when the unit is turned on.
Off
You must press the OPEN button
(1) to open the TFT panel.
Manual
When the ignition is turned OFF, the
TFT panel DOES NOT retract if it
was previously out
Beep
On
When turned on, an audible beep
tone confirms each function selec-
tion.
Clock
(HH:MM)
See “Adjusting the clock” to learn
how to set the clock.
BACK
Return to previous menu.
Table 5: General Setup Menu Features
Setting
Options
Function