Kenwood DDX276BT Instruction Manual - Page 46
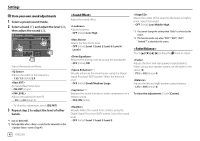
<OSD Clock>, <Demonstration>, <Scroll>, <Home Customize>, <Screen Adjustment&
 |
View all Kenwood DDX276BT manuals
Add to My Manuals
Save this manual to your list of manuals |
Page 46 highlights
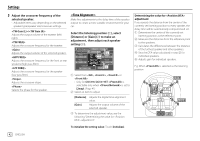
Settings 3 Adjust the image (1), then capture the image (2). • ON (Initial): Activates the display demonstration. • OFF: Deactivates the display demonstration. $BQUVSF $BODFM • ON (Initial): Scrolls the displayed information repeatedly. • Once: Scrolls the displayed information once. • OFF: Cancels. E.g. Image adjustment screen for DDX396 [J][K][H][I] Moves the zooming frame. [ ] Magnifies the scene. /// [IW]* Starts/pauses playback. [ ]* Advances scenes frame by frame. A confirmation message appears. Touch [Yes] to store the newly captured image. (The existing image is replaced with the new one.) • To return to the previous screen, touch [No]. • To cancel the capture, touch [Cancel]. Touching [
-
 1
1 -
2
-
3
-
4
-
5
-
6
-
7
-
8
-
9
-
10
-
11
-
12
-
13
-
14
-
15
-
16
-
17
-
18
-
19
-
20
-
21
-
22
-
23
-
24
-
25
-
26
-
27
-
28
-
29
-
30
-
31
-
32
-
33
-
34
-
35
-
36
-
37
-
38
-
39
-
40
-
 41
41 -
 42
42 -
 43
43 -
 44
44 -
 45
45 -
 46
46 -
 47
47 -
 48
48 -
 49
49 -
 50
50 -
 51
51 -
52
-
53
-
54
-
55
-
56
-
57
-
58
-
59
-
60
-
61
-
62
-
63
-
64
-
65
-
66
-
67
-
68
-
69
-
70
-
71
-
72
 |
 |

3
Adjust the image (
1
), then capture the
image (
2
).
Capture
Cancel
E.g. Image adjustment screen for
DDX396
[
J
][
K
][
H
][
I
]
Moves the zooming frame.
[
]
Magnifies the scene.
<OFF>/<Zoom1>/<Zoom2>/
<Zoom3>
[
IW
]*
Starts/pauses playback.
[
]*
Advances scenes frame by frame.
A confirmation message appears. Touch
[Yes]
to store the newly captured image. (The existing
image is replaced with the new one.)
• To return to the previous screen, touch
[No]
.
• To cancel the capture, touch
[Cancel]
.
* Not displayed when playing an external component connected to
the AV-IN input terminal.
<OSD Clock>
•
ON
: Displays the clock while a video source is
playing.
•
OFF
(Initial): Cancels.
<Demonstration>
•
ON
(Initial): Activates the display demonstration.
•
OFF
: Deactivates the display demonstration.
<Scroll>
•
ON
(Initial): Scrolls the displayed information
repeatedly.
•
Once
: Scrolls the displayed information once.
•
OFF
: Cancels.
Touching
[<]
scrolls the text regardless of this setting.
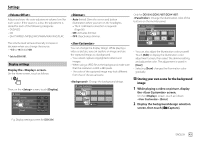
<Home Customize>
Arrange the items to display on the Home screen.
Select an item (
1
) to replace, then select the
item (
2
) you want to display in the selected
position.
Repeat this step to place icons for other items.
• Only selectable sources are shown.
HOME
Customize
Pandora
iPod
TEL
Radio
R di
E.g. Home customize screen for
DDX396
Settings
Settings
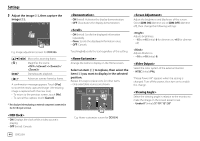
<Screen Adjustment>
Adjust the brightness and blackness of the screen.
Select
[DIM ON]
(dimmer on) or
[DIM OFF]
(dimmer
off), then change the following settings:
<Bright>
Adjusts brightness.
•
–15
to
+15
(Initial:
0
for dimmer on,
+15
for dimmer
off)
<Black>
Adjusts blackness.
•
–10
to
+10
(Initial:
0
)
<Video Output>
Select the color system of the external monitor.
•
NTSC
(Initial)/
PAL
“Please Power Off” appears when the setting is
changed. Turn off the power, then turn on to enable
the change.
<Viewing Angle>
Select the viewing angle in relation to the monitor to
make the image on the screen easier to see.
•
Under 0°
(Initial)/
5°
/
10°
/
15°
/
20°
44
ENGLISH