Kenwood DPX540BT Instruction manual - Page 9
Set the clock and date, Set the initial settings
 |
View all Kenwood DPX540BT manuals
Add to My Manuals
Save this manual to your list of manuals |
Page 9 highlights
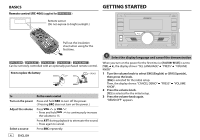
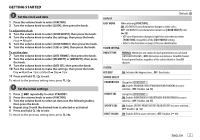
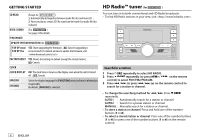
GETTING STARTED 2 Set the clock and date 1 Press the volume knob to enter [FUNCTION]. 2 Turn the volume knob to select [CLOCK], then press the knob. To adjust the clock 3 Turn the volume knob to select [CLOCK ADJUST], then press the knob. 4 Turn the volume knob to make the settings, then press the knob. Hour Minute 5 Turn the volume knob to select [CLOCK FORMAT], then press the knob. 6 Turn the volume knob to select [12H] or [24H], then press the knob. To set the date 7 Turn the volume knob to select [DATE FORMAT], then press the knob. 8 Turn the volume knob to select [DD/MM/YY] or [MM/DD/YY], then press the knob. 9 Turn the volume knob to select [DATE SET], then press the knob. 10 Turn the volume knob to make the settings, then press the knob. Day Month Year or Month Day Year 11 Press and hold to exit. To return to the previous setting item, press . 3 Set the initial settings 1 Press repeatedly to enter STANDBY. 2 Press the volume knob to enter [FUNCTION]. 3 Turn the volume knob to select an item (see the following table), then press the knob. 4 Repeat step 3 until the desired item is selected or activated. 5 Press and hold to exit. To return to the previous setting item, press . Default: XX DISPLAY EASY MENU When entering [FUNCTION]... ON: LCD DISPLAY zone illumination changes to white color. ; OFF: LCD DISPLAY zone illumination remains as [COLOR SELECT] color. ( 32) • KEY zone illumination changes to light blue color when you enter [FUNCTION], irregardless of the [EASY MENU] setting. • Refer to the illustration on page 32 for zone identification. TUNER SETTING PRESET TYPE NORMAL: Memorizes one station for each preset button in each band (FM1/FM2/FM3/AM). ; MIX: Memorizes one station or SiriusXM channel for each preset button, regardless of the selected band or SiriusXM channel. SYSTEM KEY BEEP ON: Activates the keypress tone. ; OFF: Deactivates. SOURCE SELECT PANDORA SRC (Except for ) ON: Enables PANDORA FRONT/PANDORA REAR/PANDORA in source selection. ; OFF: Disables. ( 13) IHEART SRC (Except for ) ON: Enables IHEARTRADIO-F/IHEARTRADIO-R/IHEARTRADIO in source selection. ; OFF: Disables. ( 15) SPOTIFY SRC ON: Enables SPOTIFY FRONT/SPOTIFY REAR/SPOTIFY in source selection. ; OFF: Disables. ( 16) BUILT-IN AUX ON: Enables AUX in source selection. ; OFF: Disables. ( 13) ENGLISH 5
-
 1
1 -
2
-
3
-
 4
4 -
 5
5 -
 6
6 -
 7
7 -
 8
8 -
 9
9 -
 10
10 -
 11
11 -
 12
12 -
 13
13 -
 14
14 -
15
-
16
-
17
-
18
-
19
-
20
-
21
-
22
-
23
-
24
-
25
-
26
-
27
-
28
-
29
-
30
-
31
-
32
-
33
-
34
-
35
-
36
-
37
-
38
-
39
-
40
-
41
-
42
-
43
-
44
-
45
-
46
-
47
-
48
-
49
-
50
-
51
-
52
-
53
-
54
-
55
-
56
-
57
-
58
-
59
-
60
-
61
-
62
-
63
-
64
-
65
-
66
-
67
-
68
-
69
-
70
-
71
-
72
-
73
-
74
-
75
-
76
-
77
-
78
-
79
-
80
-
81
-
82
-
83
-
84
-
85
-
86
-
87
-
88
-
89
-
90
-
91
-
92
-
93
-
94
-
95
-
96
-
97
-
98
-
99
-
100
-
101
-
102
-
103
-
104
-
105
-
106
-
107
-
108
-
109
-
110
-
111
-
112
-
113
-
114
-
115
-
116
-
117
-
118
-
119
-
120
-
121
-
122
-
123
-
124
-
125
-
126
-
127
-
128
-
129
-
130
-
131
-
132
-
133
-
134
-
135
-
136
-
137
-
138
-
139
-
140
-
141
-
142
-
143
-
144
 |
 |
