Kenwood DRV-A100 Operation Manual - Page 4
Before Use, Dashboard Camera Function Guide
 |
View all Kenwood DRV-A100 manuals
Add to My Manuals
Save this manual to your list of manuals |
Page 4 highlights
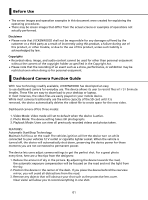
Before Use • The screen images and operation examples in this document were created for explaining the operating procedures. • There may be screen images that differ from the actual screens or examples of operations not actually performed. Disclaimer • Please note that JVCKENWOOD shall not be responsible for any damages suffered by the customer or a third party as a result of incorrectly using this product, a failure during use of this product, or other trouble, or due to the use of this product, unless such liability is acknowledged by law. Copyrights • Recorded video, image, and audio content cannot be used for other than personal enjoyment without the consent of the copyright holder as specified in the Copyright Act. • Please note that the recording of an event such as a show, performance, or exhibition may be restricted even when doing so for personal enjoyment. Dashboard Camera Function Guide With new technology readily available, JVCKENWOOD has developed an easy to use dashboard camera for everyday use. The device allows its user to record files in1 / 3 / 5minute lengths. These files are easy to download to your desktop or laptop. In most instances, the video files are easily played on your mobile device. While most cameras traditionally use the entire capacity of the SD card until it is removed, the device automatically deletes the oldest file to create space for the new video. Dashboard camera offers three modes: 1. Video Mode: Video mode will set to default when the device is active. 2. Photo Mode: The device setting takes still photographs. 3. Playback Mode: Users can view all previously recorded videos and photos taken. FEATURES: Automatic Start/Stop Technology: Maintain full focus on the road! The vehicles ignition will let the device turn on while connected to your vehicles 12 V outlet or cigarette lighter socket. When the vehicle is turned off, the device will automatically shut down, preserving the device power for those moments you are not connected to permanent power. The device lets users adjust camera settings to get the perfect shot. For a great photo every time, here are a few tips from the designers: 1. Reduce the amount of sky in the picture. By adjusting the device towards the road, the automatic exposure compensation will be focused on the road and not the light from the sky. 2. Position the device in the center of the dash. If you place the device behind the rearview mirror, you will avoid all distractions from the road. 3. Remove any objects that will obstruct your shot such as the protective lens cover. Clear vision will allow you to record everything in one shot. 01
-
 1
1 -
 2
2 -
 3
3 -
 4
4 -
 5
5 -
 6
6 -
 7
7 -
 8
8 -
 9
9 -
 10
10 -
11
-
12
-
13
-
14
-
15
-
16
-
17
-
18
-
19
-
20
-
21
-
22
-
23
-
24
-
25
-
26
-
27
-
28
-
29
-
30
-
31
-
32
-
33
-
34
-
35
-
36
-
37
-
38
-
39
-
40
-
41
-
42
-
43
-
44
-
45
-
46
-
47
-
48
 |
 |