Kenwood DVT-6300-H Instruction Manual - Page 9
System Connections - ksw
 |
UPC - 019048155719
View all Kenwood DVT-6300-H manuals
Add to My Manuals
Save this manual to your list of manuals |
Page 9 highlights
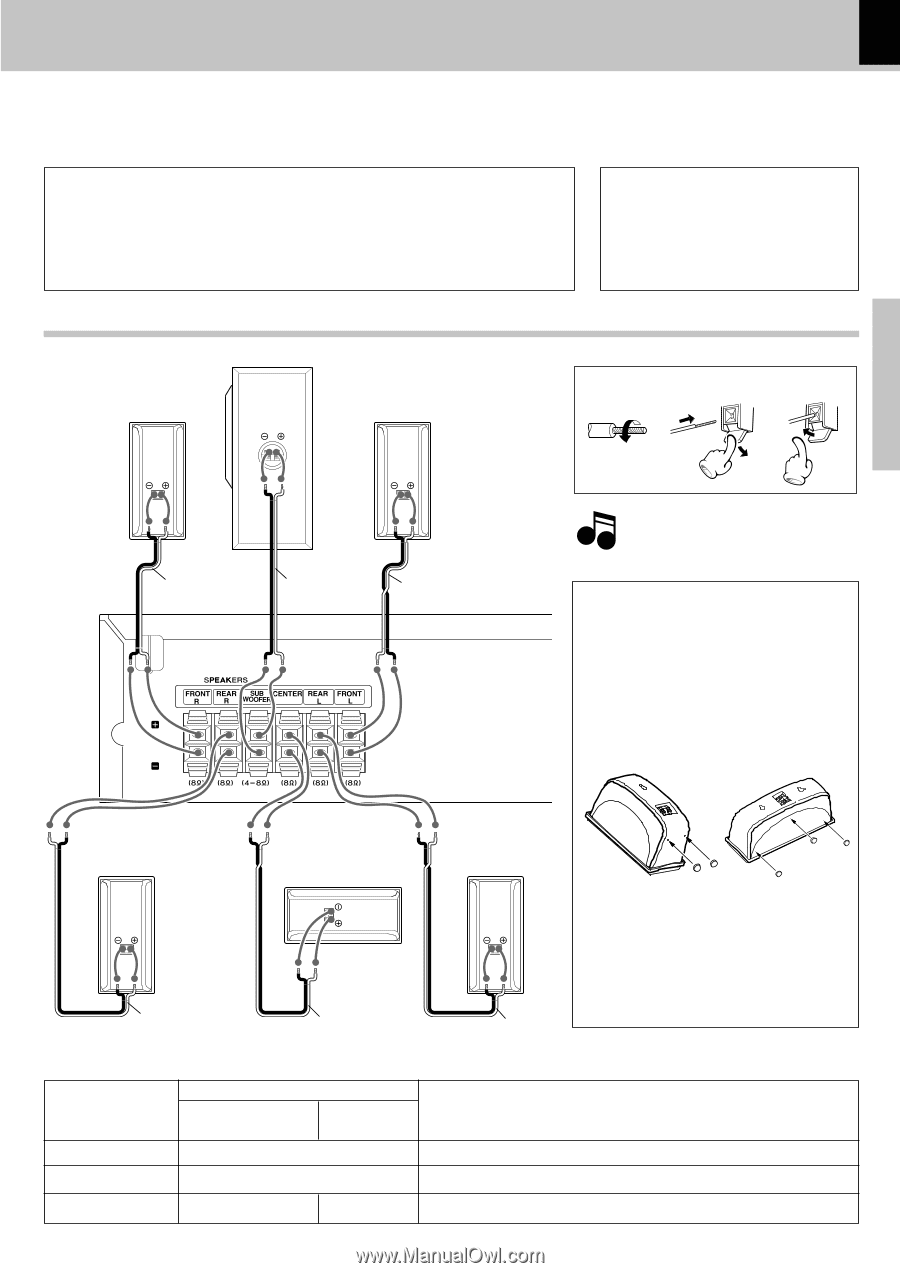
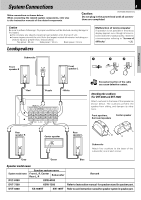
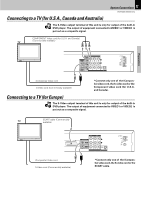
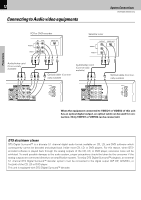
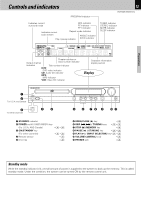
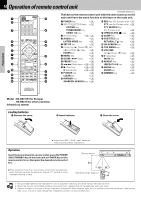
Preparations System Connections Make connections as shown below. When connecting the related system components, refer also to the instruction manuals of the related components. 9 Caution: DVR-6300 (EN/K,P,E,X) Do not plug in the power lead until all connec- tions are completed. Caution Be sure to adhere followings. Or proper ventilation will be blocked causing damage or fire hazard. ÷ Do not place any objects impairing heat radiation onto the top of unit. ÷ Leave a space around the unit (from the largest outside dimension including pro- jection) equal or greater than, shown below. Top panel : 50 cm Side panel : 10 cm Back panel : 10 cm Loudspeakers Malfunction of microcomputer If operation is not possible or erroneous display appears even though all connec- tions have been made properly, reset the microcomputer referring to "In case of difficulty". e Subwoofer Front speaker R 1 2 3 Front speaker L Red Purple White Excessive insertion of the cable Note can cause defective contact. Attaching the cushions (For DVT-6300 and DVT-7300) Attach cushions to the base of the speaker as shown below. The cushions prevent the speaker from sliding, and dampen its vibrations. Front speakers, Surround speakers Center speaker Rear speaker R Center speaker Rear speaker L Subwoofer Attach four cushions to the base of the subwoofer, one at each corner. Gray Green Blue Speaker model name Speaker system name System model name Front L, R, Center Rear L, R Subwoofer Remark DVT-6300 KSW-6300 DVT-7300 KSW-7300 Refer to instruction manual for speaker stand in speaker part. DVT-8300 KS-908HT SW-18HT Refer to each instruction manual for speaker system in speaker part.
-
 1
1 -
2
-
3
-
 4
4 -
 5
5 -
 6
6 -
 7
7 -
 8
8 -
 9
9 -
 10
10 -
 11
11 -
 12
12 -
 13
13 -
 14
14 -
15
-
16
-
17
-
18
-
19
-
20
-
21
-
22
-
23
-
24
-
25
-
26
-
27
-
28
-
29
-
30
-
31
-
32
-
33
-
34
-
35
-
36
-
37
-
38
-
39
-
40
-
41
-
42
-
43
-
44
-
45
-
46
-
47
-
48
 |
 |