Kenwood KMR-M505DAB Instruction Manual - Page 41
Part list for installation, Determine the antenna installation position, Caution, Installation
 |
View all Kenwood KMR-M505DAB manuals
Add to My Manuals
Save this manual to your list of manuals |
Page 41 highlights
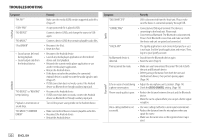
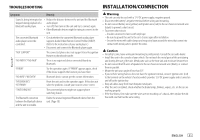
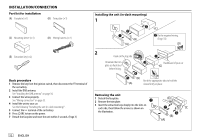
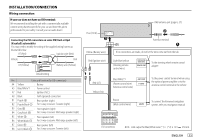
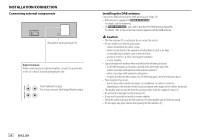
INSTALLATION/CONNECTION Part list for installation (F) Film antenna (×1) (G) Amplifier unit (cable with booster, 3.5 m) (×1) (H) Cable clamper (×3) (I) Cleaner (×1) Caution When installing the antenna cable inside the front pillar with the air bag installed • The front pillar cover is secured with a special clip which may need to be replaced when it is removed. Contact your vehicle dealer for details on removing the front pillar cover and availability of replacement parts. Clip Front pillar Determine the antenna installation position • The direction of the film antenna (F) changes depending on whether the film antenna (F) is installed on the right side or left side. • Be sure to check the installation location of film antenna (F) before installing. Film antenna cannot be re-pasted. • Separate from other antennas by at least 100 mm. • Do not paste the amplifier unit (G) on the ceramic line (black part) around the front glass. Because there is not enough adhesion. Installing the antenna on the left side Installing the antenna on the right side Ceramic line (black part) Earth sheet* (F) (G) (G) (F) Earth sheet* * Paste the earth sheet of the amplifier unit (G) on the metal part of the front pillar. • Install the amplifier unit (G) above the air bag so that it does not obstruct the operation of the air bag. Installation overview The antenna should be installed on the passenger side for safety. (G) Air bag ENGLISH 35
-
 1
1 -
2
-
3
-
4
-
5
-
6
-
7
-
8
-
9
-
10
-
11
-
12
-
13
-
14
-
15
-
16
-
17
-
18
-
19
-
20
-
21
-
22
-
23
-
24
-
25
-
26
-
27
-
28
-
29
-
30
-
31
-
32
-
33
-
34
-
35
-
 36
36 -
 37
37 -
 38
38 -
 39
39 -
 40
40 -
 41
41 -
 42
42 -
 43
43 -
 44
44 -
 45
45 -
 46
46 -
47
-
48
-
49
-
50
-
51
-
52
-
53
-
54
-
55
-
56
-
57
-
58
-
59
-
60
-
61
-
62
-
63
-
64
-
65
-
66
-
67
-
68
-
69
-
70
-
71
-
72
-
73
-
74
-
75
-
76
-
77
-
78
-
79
-
80
-
81
-
82
-
83
-
84
-
85
-
86
-
87
-
88
-
89
-
90
-
91
-
92
-
93
-
94
-
95
-
96
-
97
-
98
-
99
-
100
-
101
-
102
-
103
-
104
-
105
-
106
-
107
-
108
-
109
-
110
-
111
-
112
-
113
-
114
-
115
-
116
-
117
-
118
-
119
-
120
-
121
-
122
-
123
-
124
 |
 |
