Kenwood KOS-V500 Instruction Manual - Page 54
System Setup, AV Interface Setup - remote
 |
UPC - 019048171528
View all Kenwood KOS-V500 manuals
Add to My Manuals
Save this manual to your list of manuals |
Page 54 highlights
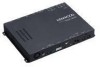
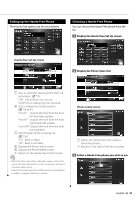
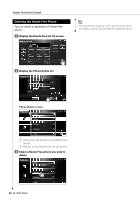
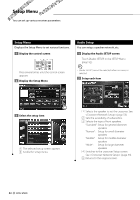
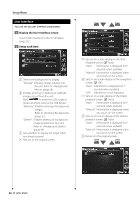
Setup Menu System Setup You can set up the system parameters. 1 Display the System SETUP screen Touch [System SETUP] in the SETUP Menu (page 52). 2 Setup each item 1 2 3 4 1 Turns the key touch tone On or Off. ( On) 2 Allows scrolling of text display on the Source Control screen. ( Manual) "Auto": Scrolls the screen automatically. "Manual": Allows you to scroll the screen manually. 3 Selects a remote control signal. ( On) When turned "Off", the remote control of TV reception is rejected. 4 Returns to the original screen. 5 6 7 5 Controlling the built-in amplifier.* ( On) "On": Uses the built-in amplifier. "Off": Uses the optional amplifier connected to this unit. 6 Sets the tuner source.* ( On) "On": Uses the built-in tuner to receive a radio station. "Off": Uses the tuner of your vehicle to receive a radio station. 7 Returns to the original screen. ⁄ • * In order to receive a radio station with the built-in tuner, you need to connect an antenna cord. Refer to (page 76). • * Setting can be made only in standby mode. AV Interface Setup You can set audio and visual (AV) interface parameters. 1 Display the AV Interface screen Touch [AV Interface] in the SETUP Menu (page 52). 2 Setup each item 1 2 3 4 5 1 Sets a name to be displayed when you select a system that is connected via the AV INPUT1 port. ( VIDEO1) ⁄ • If you have set the navigation system connection to "AV-IN", the display is fixed to "NAV1". 2 Sets an image display of the system that is connected via the AV INPUT2 port. ( Off ) "Off": When the image source is switched, an image entered via the AV INPUT2 port is displayed. "On": When an image signal is entered via the AV INPUT2 port, this image is displayed. 3 Sets a name to be displayed when you select an image of the system that is connected via the AV INPUT2 port. ( VIDEO2) 54 KOS-V500
-
 1
1 -
2
-
3
-
4
-
5
-
6
-
7
-
8
-
9
-
10
-
11
-
12
-
13
-
14
-
15
-
16
-
17
-
18
-
19
-
20
-
21
-
22
-
23
-
24
-
25
-
26
-
27
-
28
-
29
-
30
-
31
-
32
-
33
-
34
-
35
-
36
-
37
-
38
-
39
-
40
-
41
-
42
-
43
-
44
-
45
-
46
-
47
-
48
-
 49
49 -
 50
50 -
 51
51 -
 52
52 -
 53
53 -
 54
54 -
 55
55 -
 56
56 -
 57
57 -
 58
58 -
 59
59 -
60
-
61
-
62
-
63
-
64
-
65
-
66
-
67
-
68
-
69
-
70
-
71
-
72
-
73
-
74
-
75
-
76
-
77
-
78
-
79
-
80
-
81
-
82
-
83
-
84
 |
 |