Kenwood VRS-7200 Instruction Manual - Page 20
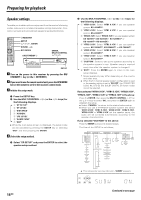
Preparing for playback, Adjust the speaker volume level.
 |
View all Kenwood VRS-7200 manuals
Add to My Manuals
Save this manual to your list of manuals |
Page 20 highlights
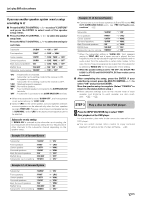
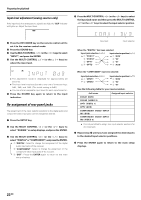
Preparing for playback ! Use the MULTI CONTROL % / fi (or the % / fi keys) to select the appropriate BS/SW amp setting. 1 "BS/SW BS": Select this setting when a surround back speaker is connected to the SURR BACK/SW terminals. In this case, the subwoofer signal will be output from the PRE OUT SUBWOOFER jack. 2 "BS/SW SW": Select when the subwoofer speaker is connected to the SURR BACK/SW terminals. In this case, the surround back signals will be output from the PRE OUT SURROUND BACK jacks. 3 "BS/SW OFF": Select when no speaker is connected to the SURR BACK/SW terminals. In this case, the subwoofer signal will be output from the PRE OUT SUBWOOFER jack and the surround back signals will be output from the PRE OUT SURROUND BACK jacks. ÷ If "BS/SW BS" is selected, only one surround back speaker can be connected to the receiver. ÷ If "BS/SW SW" or "BS/SW OFF" is selected, two surround back speakers can be connected to the PRE OUT SURROUND BACK jacks through an external power amplifier. $ @ Use the MULTI CONTROL # (or the # key) to accept the setting. ÷ The subwoofer re-mix setting indication "REMIX" appears. # Use the MULTI CONTROL % / fi (or the % / fi keys) to select the appropriate subwoofer re-mix setting. If "REMIX ON" is selected as the subwoofer re-mix setting, the low frequencies are enhanced by adding the low frequencies of other channels to the subwoofer channel depending on the speaker setup. 1 "REMIX ON" : Subwoofer re-mix setting mode to the receiver is ON. 2 "REMIX OFF" : Subwoofer re-mix setting mode to the receiver is OFF. ÷ The initial setting is "REMIX ON". ÷ The subwoofer re-mix setting is possible only when the subwoofer setting is "SUBW ON" and the front speaker setting is "FRNT LRG". $ Press the ENTER. If your selection is correct, press the MULTI CONTROL % / fi (or the % / fi keys) to select "OK". Press the ENTER again to return to the main setup displays. ÷ Select "CANCEL" and press the ENTER to return to the status before setup. 6 Adjust the speaker volume level. From your usual listening position, adjust the volume levels. The volume levels from each speaker should be the same. ÷ In steps 6, indications appear only for the selected channels of the speakers that require adjusting. 1 Use the MULTI CONTROL @ / # (or the @ / # keys) to select "SP LEVEL" on setup displays, and press the ENTER. 2 Use the MULTI CONTROL @ / # (or the @ / # keys) to select "AUTO", "MANUAL" or "OFF". 1 "AUTO": Select this setting to adjust the speaker volume levels using the test tone. The test tone will be output from every speaker channel in automatic sequence. 2 "MANUAL": Select to select the speaker channel to output the test tone using the MULTI CONTROL@ / # (or the @ / # keys). 3 "OFF": Select to adjust the speaker volume levels using the current output signals. The speaker channel to output the output signal can be selected using the MULTI CONTROL@ / # (or the @ / # keys). 4 "EXIT": Press the ENTER again to return to the main setup displays. When "AUTO" or "MANUAL" is selected and the ENTER is pressed again, the test tone output will start. Use the MULTI CONTROL % / fi (or the % / fi keys) to adjust the volume level of the test tone output from the speaker channel to be adjusted. For "AUTO" selection, the first test tone is heard from the front left speaker for 2 seconds. The next test tone is heard from the speakers in the following sequence for 2 seconds each. When the "BS/SW BS" has been selected : When the "BS/SW SW" or "BS/SW OFF" has been selected: The channel indication blinks while the test tone is being output. ÷ When a speaker setup is set to off the volume level for the corresponding speakers is reset to 0 dB. When "MANUAL" or "OFF" is selected, press the MULTI CONTROL @/# (or the @/# keys) to select the speaker channel and then press the MULTI CONTROL %/fi (or the %/fi keys) to adjust the speaker volume level. 3 Press the ENTER again to return to the main setup displays. ÷ The test tone is turned off and return to the main setup displays. 20 EN Continued to next page
-
 1
1 -
2
-
3
-
4
-
5
-
6
-
7
-
8
-
9
-
10
-
11
-
12
-
13
-
14
-
 15
15 -
 16
16 -
 17
17 -
 18
18 -
 19
19 -
 20
20 -
 21
21 -
 22
22 -
 23
23 -
 24
24 -
 25
25 -
26
-
27
-
28
-
29
-
30
-
31
-
32
-
33
-
34
-
35
-
36
-
37
-
38
-
39
-
40
-
41
-
42
-
43
-
44
-
45
-
46
-
47
-
48
-
49
-
50
-
51
-
52
-
53
-
54
-
55
-
56
-
57
-
58
-
59
-
60
 |
 |
