Kenwood XD-355 User Manual - Page 12
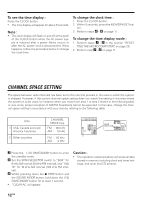
Channel Space Setting
 |
View all Kenwood XD-355 manuals
Add to My Manuals
Save this manual to your list of manuals |
Page 12 highlights
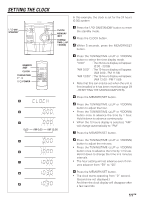
To see the time display : Press the CLOCK button. • The time display will appear for about 5 seconds. Note : • The clock display will flash on and off at the push of the CLOCK button when the AC power supply is restored after a power failure occurs or after the AC power cord is disconnected. If this happens, follow the procedure below to change the clock time. To change the clock time : 1 Press the CLOCK button. 2 Within 5 seconds, press the MEMORY/SET but- ton. 3 Perform steps 6 - 9 on page 11 . To change the time display mode : 1 Perform steps 1 - 2 in the section "RESET- TING THE MICROCOMPUTER", on page 29. 2 Perform step 1 - 9 on page 11. CHANNEL SPACE SETTING The space between radio channels has been set to the one that prevails in the area to which the system is shipped. However, if the current channel space setting does not match the setting in the area where the system is to be used, for instance when you move from area 1 or area 2 shown in the following table or vice versa, proper reception of AM/FM broadcasts cannot be expected. In this case, change the channel space setting in accordance with your area by refering to the following table. Area 1 USA, Canada and Latin America Countries 2 Other countries CHANNEL SPACE freq. FM : 100 kHz AM : 10 kHz FM : 50 kHz AM : 9 kHz 1 Press the ON/STANDBY button to enter the standby mode. 2 Set the SPAN SELECTOR switch to "50/9" for 9 kHz AM interval (50 kHz FM interval), and "100/ 10" for 10 kHz AM interval (100 kHz FM inter- val). 3 Whilst pressing down the 7 STOP button and the SOUND MODE button, hold down the ON/STANDBY button for at least 1 second. • "CLEAR AL" will appear. Caution : • The operation explained above will erase all data stored in memory including clock and timer settings, and tuner and CD presets. 12 EN
-
 1
1 -
2
-
3
-
4
-
5
-
6
-
 7
7 -
 8
8 -
 9
9 -
 10
10 -
 11
11 -
 12
12 -
 13
13 -
 14
14 -
 15
15 -
 16
16 -
 17
17 -
18
-
19
-
20
-
21
-
22
-
23
-
24
-
25
-
26
-
27
-
28
-
29
-
30
-
31
-
32
 |
 |
