Kenwood XD-355 User Manual - Page 24
Dubbing from tape to tape, Erasing recorded tapes, Press the TAPE A/B button until TAPE B ap
 |
View all Kenwood XD-355 manuals
Add to My Manuals
Save this manual to your list of manuals |
Page 24 highlights
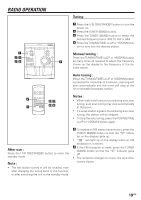
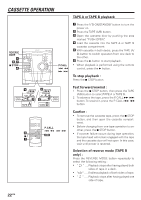
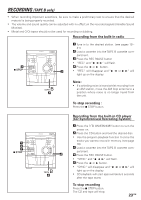
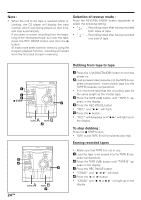
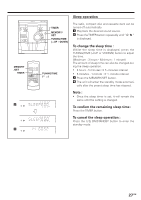
Note : • When the end of the tape is reached whilst re- cording, the CD player will display the track number which was being played at that time, and stop automatically. If you want to restart recording from the beginning of the interrupted track, turn over the tape, press the REC PAUSE button and then the 3 button. (If tracks have been stored in memory using the program playback function, recording will restart from the first track stored in memory.) Selection of reverse mode : Press the REVERSE MODE button repeatedly to select the following setting : Recording stops after having recorded both sides of tape. Recording stops after having recorded one side of tape. 1 3 5 7 STOP 2 4 24 EN 2 1 4 3 Dubbing from tape to tape 1 Press the ON/STANDBY button to turn the power on. 2 Load a prerecorded cassette into the TAPE A cas- sette compartment. Insert a blank tape into the TAPE B cassette compartment. • It is recommended that the recording tape be the same length as the master tape. 3 Press the TAPE (A/B) button until "TAPE A" ap- pears in the display. 4 Press the REC PAUSE button. • "REC." and "¶ 3" will flash. 5 Press the 3 button. • "REC." will disappear and "¶ 3" will light up on the display. To stop dubbing : Press the 7 STOP button. • TAPE A and TAPE B will simultaneously stop. Erasing recorded tapes • Make sure that TAPE A is not in use. 1 Load the tape to be erased into the TAPE B cas- sette compartment. 2 Press the TAPE (A/B) button until "TAPE B" ap- pears in the display. 3 Press the REC PAUSE button. • "ERASE" and "¶ 2 3" will flash. 4 Press the 2 or 3 button. • "ERASE" and "¶ 2 or ¶ 3" will light up on the display.
-
 1
1 -
2
-
3
-
4
-
5
-
6
-
7
-
8
-
9
-
10
-
11
-
12
-
13
-
14
-
15
-
16
-
17
-
18
-
 19
19 -
 20
20 -
 21
21 -
 22
22 -
 23
23 -
 24
24 -
 25
25 -
 26
26 -
 27
27 -
 28
28 -
 29
29 -
30
-
31
-
32
 |
 |
