Kenwood XXV-05V Instruction Manual - Page 88
miswiring. Before calling service, first check the following table for possible problems.
 |
View all Kenwood XXV-05V manuals
Add to My Manuals
Save this manual to your list of manuals |
Page 88 highlights
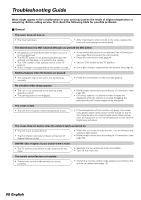
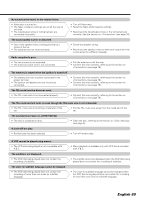
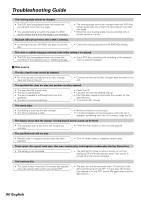
Troubleshooting Guide What might appear to be a malfunction in your unit may just be the result of slight misoperation or miswiring. Before calling service, first check the following table for possible problems. ˙ General The power does not turn on. • The fuse has blown. • After checking for short circuits in the wires, replace the fuse with one having the same rating. The desired source is NOT selected although you pressed the SRC button. • An optional unit required to listen to each source is not connected yet. • The RESET button is not pressed yet although the optional unit has been connected to the system. • The "O-N" switch of the optional unit is at the "O" position. • A disc changer not supported by the system is used. • A non-connected source is not selected. See (see page 78) and connect the unit correctly. • Press the reset button (see page 4). • Set the "O-N" switch to the "N" position. • Use a disc changer supported by the system (see page 4). Nothing happens when the buttons are pressed. • The computer chip in the unit is not functioning normally. • Press the reset button on the unit (see page 4). No television/video image appears. • The unit is not connected to the parking brake detection switch. • The parking brake is not engaged. • Make proper connections according to (see page 78). • For safety reasons no television/video images are displayed while the vehicle is moving. Engaging the parking brake will cause images to be displayed. The screen is dark. • The unit is in a location where temperature is low. • If the temperature of the monitor unit drops, the screen may appear darker when power is first turned on due to the characteristics of a liquid crystal panel. Wait a while after turning power on for the temperature to rise. Normal brightness will return. The screen does not darken when the vehicle's lights are turned on. • The unit is set to auto dimmer. • The illumination wire has not been connected. (If manual dimmer is set) • When the unit is set to auto dimmer, it is not linked to the vehicle's light switch. • Make proper connections according to (see page 78). AM/FM radio reception is poor and/or there is noise. • The TV antenna and vehicle's radio antenna are too close. • Separate the two antennas as far as possible. • Turn off the main unit. The remote controller does not operate. • The remote control mode selector is not set correctly. • Switch the remote control mode selector according to the source you select (see page 12). 88 English
-
 1
1 -
2
-
3
-
4
-
5
-
6
-
7
-
8
-
9
-
10
-
11
-
12
-
13
-
14
-
15
-
16
-
17
-
18
-
19
-
20
-
21
-
22
-
23
-
24
-
25
-
26
-
27
-
28
-
29
-
30
-
31
-
32
-
33
-
34
-
35
-
36
-
37
-
38
-
39
-
40
-
41
-
42
-
43
-
44
-
45
-
46
-
47
-
48
-
49
-
50
-
51
-
52
-
53
-
54
-
55
-
56
-
57
-
58
-
59
-
60
-
61
-
62
-
63
-
64
-
65
-
66
-
67
-
68
-
69
-
70
-
71
-
72
-
73
-
74
-
75
-
76
-
77
-
78
-
79
-
80
-
81
-
82
-
 83
83 -
 84
84 -
 85
85 -
 86
86 -
 87
87 -
 88
88 -
 89
89 -
 90
90 -
 91
91 -
 92
92 -
 93
93 -
94
-
95
-
96
 |
 |