KitchenAid KERS308XSS Use & Care Guide - Page 11
Radiant surface element settings, Triple radiant surface element
 |
UPC - 883049215822
View all KitchenAid KERS308XSS manuals
Add to My Manuals
Save this manual to your list of manuals |
Page 11 highlights
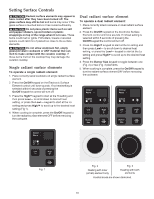
Setting Surface Controls Triple radiant surface element To operate a triple radiant element: 1. Place correctly sized cookware on triple radiant surface element. 2. Press the On/Off keypad on the Electronic Surface Element control until tone sounds. If no temperature setting is selected within 6 seconds of pressing the On/Off keypad the control will turn off. 3. Press the High/+ keypad to start at the Hi setting and then press Low/— to scroll down to desired heat setting, or press the Low/— keypad to start at the Lo setting and press High/+ to scroll up to the desired heat setting. 4. Press the Burner Size keypad to toggle between one (Fig. 1), two (Fig. 2) or three elements (Fig. 3). 5. When cooking is complete, press the On/Off keypad to turn the radiant surface element OFF before removing the cookware. Radiant surface element settings The size and type of utensil used, and the amount and type of food being cooked will influence the surface element power level setting needed for best cooking results. The suggested settings found in Fig. 4 below are based on cooking with medium-weight aluminum pans with lids. Settings may vary when using other types of pans. Suggested settings for single, dual and triple radiant surface elements table Settings Type of cooking High (90 - HI) Start most foods, bring water to a boil, pan broiling Medium high (60 - 85) Continue a rapid boil, fry, deep fat fry Medium (30 - 55) Maintain a slow boil, thicken sauces and gravies or steam vegetables Simmer (20 - 28) Keep foods cooking, poach, stew Low (LO - 18) Keep warm, melt, simmer Fig. 4 Heating with inner (small) element only Heating 2 of 3 portions Heating with all 3 portions Fig. 1 Fig. 2 Fig. 3 Heated areas are shown darkened. Important notes: • A glowing red surface heating area extending beyond the bottom edge of the cookware indicates the cookware is too small for the surface heating area. • For efficient cooking, turn OFF the element several minutes before cooking is complete. This will allow residual heat to complete the cooking process. • Each surface element provides a constant amount of heat at each setting. Refer to the Suggested radiant surface element settings table for suggested power level settings. • Start most cooking operations on a higher setting and then turn to a lower setting to finish cooking. • Radiant elements have a limiter that allows the radiant heating element to cycle ON and OFF, even at the HI setting. This helps prevent damage to the ceramic smoothtop. Cycling at the HI setting is normal and will occur more often if the cookware is too small for the radiant element or if the cookware bottom is not flat. 11
-
 1
1 -
2
-
3
-
4
-
5
-
 6
6 -
 7
7 -
 8
8 -
 9
9 -
 10
10 -
 11
11 -
 12
12 -
 13
13 -
 14
14 -
 15
15 -
 16
16 -
17
-
18
-
19
-
20
-
21
-
22
-
23
-
24
-
25
-
26
-
27
-
28
-
29
-
30
-
31
-
32
-
33
-
34
-
35
-
36
 |
 |
