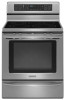
KitchenAid KERS308XSS Use & Care Guide - Page 14
Setting Oven Controls
 |
UPC - 883049215822
View all KitchenAid KERS308XSS manuals
Add to My Manuals
Save this manual to your list of manuals |
Page 14 highlights
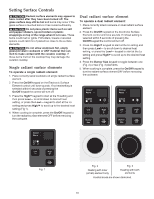
Setting Oven Controls Setting Clock When the appliance is first powered up, 12:00 will flash in the display (See Fig. 1). The time of day must first be set before operating the oven. Fig. 1 Example — To set the clock to 1:30: 1. Press Clock Set/Start keypad. 2. Enter 1 3 0 using numeric keypads. 3. Press START. Important note: The clock cannot be changed when a Cook Time or Delay Start feature is active. Setting Timer The minute timer allows you to track your cooking times without interfering with the cooking process. The timer may be set from 1 minute up to 11 hours and 59 minutes. Example — To set the timer for 5 minutes: 1. Press Timer Set/Off keypad. 2. Enter 5 using numeric keypad. 3. Press START keypad to start timer. To cancel the timer when active press Timer Set/Off keypad again. Setting 12 or 24 hour display mode The clock display mode allows you to choose between 12 or 24 hr modes. The factory preset clock display mode is 12 hours. Example — To set 12 or 24 hour display mode: 1. Press and hold Clock Set/Start keypad for 6 seconds. 2. Press Self Clean keypad to toggle between 12 Hr day or 24 Hr day display modes (See Figs. 2 & 3). 3. Press START to accept choice. Fig. 2 Fig. 3 Changing between continuous bake setting or 12-Hour Energy Saving feature The oven control has a factory preset built-in 12 Hour Energy Saving feature that will turn off the oven if the oven is left on for more than 12 hours. The control may be programmed to override this feature to continuously bake. Example — To change between continuous bake or 12-Hour Energy saving feature: 1. Press and hold Timer Set/Off keypad for 6 seconds. 2. Press Self Clean to toggle between 12 Hour OFF (Fig. 4) or Stay On (Fig. 5) feature. 3. Press START to accept choice. Important notes: • The timer does not start or stop the cooking process. It serves as an extra minute timer in the kitchen that will beep when the set time has run out. The timer may be used alone or while using any of the other oven functions. • The timer will display hours and minutes until 1 hour remains. When less than 1 hour remains, the display will count down in minutes and seconds. Once the timer has less than 1 minute remaining only seconds will display. • When the timer is active during a cooking process, the minute timer will show in the display. To view the information of any other active oven function, press the keypad once for the other function to view the status. Fig. 4 Fig. 5 14
-
 1
1 -
2
-
3
-
4
-
5
-
6
-
7
-
8
-
 9
9 -
 10
10 -
 11
11 -
 12
12 -
 13
13 -
 14
14 -
 15
15 -
 16
16 -
 17
17 -
 18
18 -
 19
19 -
20
-
21
-
22
-
23
-
24
-
25
-
26
-
27
-
28
-
29
-
30
-
31
-
32
-
33
-
34
-
35
-
36
 |
 |
