KitchenAid KUDD03DTWH Installation Instructions - Page 9
Warning - attachments
 |
UPC - 883049128030
View all KitchenAid KUDD03DTWH manuals
Add to My Manuals
Save this manual to your list of manuals |
Page 9 highlights
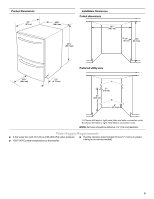
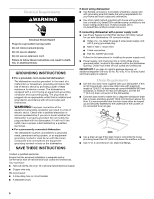
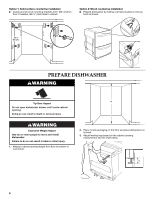
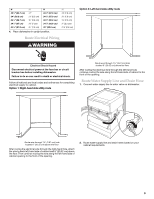
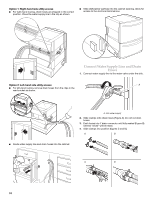
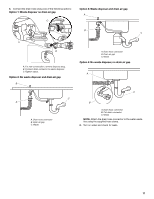
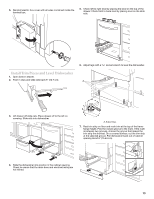
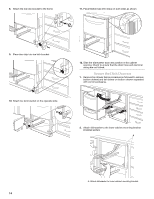
H 33³⁄₄" (85.7 cm) 34" (86.3 cm) 34¹⁄₈" (86.7 cm) 34¹⁄₄" (87 cm) 34³⁄₈" (87.3 cm) : X : 0 0.3 cm) :¼" (0.6 cm 1 cm) :½" (1.3 cm) H 34¹⁄₂" (87.6 cm) 34⁵⁄₈" (87.9 cm) 34³⁄₄" (88.3 cm) 34⁷⁄₈" (88.6 cm) 35" (88.9 cm) 4. Place dishwasher in upright position. : X 1.6 cm 1.9 cm 2.2 cm) :1" (2.5 cm) :1¹⁄₈" (2.9 cm) Route Electrical Wiring WARNING Option 2: Left-hand side utility route Electrical Shock Hazard Disconnect electrical power at the fuse box or circuit breaker box before installing dishwasher. Failure to do so can result in death or electrical shock. Follow all national and local codes and ordinances for completing electrical supply to cabinet. Option 1: Right-hand side utility route Route wire through 1½" (3.81 cm) hole located 8" (20.32 cm) above the floor. After routing the electrical wire through the left-hand hole, continue routing the wire along the left-hand side of cabinet to the front of the opening. Route Water Supply Line and Drain Hose 1. Connect water supply line to water valve on dishwasher. Route wire through 1½" (3.81 cm) hole located 8" (20.32 cm) above the floor. After routing the electrical wire through the right-hand hole, attach the wire to back left-hand side of cabinet wall 8" (20.32 cm) above the floor. Then continue routing the wire along the left-hand side of cabinet opening to the front of the opening. 2. Route water supply line and drain hoses based on your cabinet requirements. 9
-
 1
1 -
2
-
3
-
 4
4 -
 5
5 -
 6
6 -
 7
7 -
 8
8 -
 9
9 -
 10
10 -
 11
11 -
 12
12 -
 13
13 -
 14
14 -
15
-
16
-
17
-
18
-
19
-
20
-
21
-
22
-
23
-
24
-
25
-
26
-
27
-
28
-
29
-
30
-
31
-
32
-
33
-
34
-
35
-
36
-
37
-
38
-
39
-
40
-
41
-
42
-
43
-
44
-
45
-
46
-
47
-
48
-
49
-
50
 |
 |
