Kodak I1860 User Guide - Page 47
Operator Log, that have been posted since the scanner was powered on. When - troubleshooting
 |
View all Kodak I1860 manuals
Add to My Manuals
Save this manual to your list of manuals |
Page 47 highlights
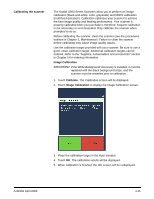
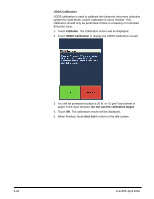
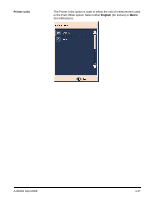
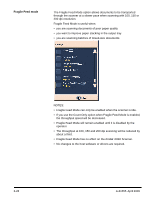
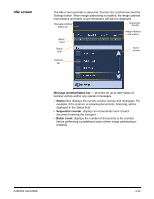
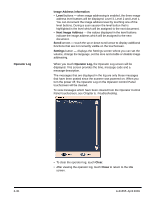
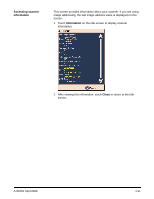
Operator Log Image Address information • Level buttons - when image addressing is enabled, the three image address level buttons will be displayed: Level 3, Level 2 and Level 1. You can increment the image address level by touching one of the level buttons. During a scan session the level button that is highlighted is the level which will be assigned to the next document. • Next Image Address - the values displayed in the level buttons indicate the image address which will be assigned to the next document. Scroll arrows - touch the up or down scroll arrow to display additional functions that are not currently visible on the touchscreen. Settings button - displays the Settings screen where you can set the volume, change the language, set the tone and enable or disable image addressing. When you touch Operator Log, the Operator Log screen will be displayed. This screen provides the time, message code and a message description. The messages that are displayed in the log are only those messages that have been posted since the scanner was powered on. When you turn the power off, the Operator Log on the Operator Control Panel touchscreen will be cleared. To view messages which have been cleared from the Operator Control Panel touchscreen, see Chapter 6, Troubleshooting. 3-30 • To clear the operator log, touch Clear. • After viewing the operator log, touch Close to return to the Idle screen. A-61555 April 2009
-
 1
1 -
2
-
3
-
4
-
5
-
6
-
7
-
8
-
9
-
10
-
11
-
12
-
13
-
14
-
15
-
16
-
17
-
18
-
19
-
20
-
21
-
22
-
23
-
24
-
25
-
26
-
27
-
28
-
29
-
30
-
31
-
32
-
33
-
34
-
35
-
36
-
37
-
38
-
39
-
40
-
41
-
 42
42 -
 43
43 -
 44
44 -
 45
45 -
 46
46 -
 47
47 -
 48
48 -
 49
49 -
 50
50 -
 51
51 -
 52
52 -
53
-
54
-
55
-
56
-
57
-
58
-
59
-
60
-
61
-
62
-
63
-
64
-
65
-
66
-
67
-
68
-
69
-
70
-
71
-
72
-
73
-
74
-
75
-
76
-
77
-
78
-
79
-
80
-
81
-
82
-
83
-
84
-
85
-
86
-
87
-
88
-
89
-
90
-
91
-
92
-
93
-
94
-
95
-
96
-
97
-
98
-
99
-
100
-
101
-
102
-
103
-
104
-
105
-
106
-
107
-
108
 |
 |
