Konica Minolta 3D Cube Printer Cube3 User Guide - Page 98
Repacking The Printer
 |
View all Konica Minolta 3D Cube Printer manuals
Add to My Manuals
Save this manual to your list of manuals |
Page 98 highlights
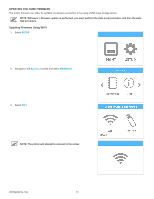
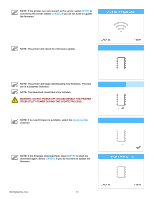
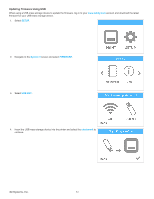
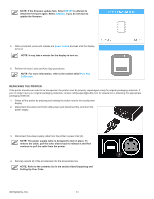
NOTE: If the firmware update fails. Select RETRY to attempt to install the firmware again. Select CANCEL if you do not want to update the firmware. 5. When prompted, press and release the power button and wait until the display turns on. NOTE: It may take a minute for the display to turn on. 6. Perform the Auto Level and Auto Gap procedures. NOTE: For more information, refer to the section titled Print Pad Calibration. REPACKING THE PRINTER If the printer should ever need to be transported, the printer must be properly repackaged using the original packaging materials. If you no longer have your original packaging materials, contact [email protected] for assistance in obtaining the appropriate packaging materials. 1. Power off the printer by pressing and holding the button next to the touchscreen display. 2. Disconnect the power cord from utility power and disconnect the cord from the power supply. 3. Disconnect the power supply cable from the printer's power inlet (A). NOTE: The power supply cable is designed to lock in place. To remove the cable, pull the outer sleeve back to release it and then continue to pull the cable from the printer. A 4. Securely repack all of the accessories into the accessories box. NOTE: Refer to the contents list in the section titled Unpacking and Setting Up Your Cube. 3D Systems, Inc. 94
-
 1
1 -
2
-
3
-
4
-
5
-
6
-
7
-
8
-
9
-
10
-
11
-
12
-
13
-
14
-
15
-
16
-
17
-
18
-
19
-
20
-
21
-
22
-
23
-
24
-
25
-
26
-
27
-
28
-
29
-
30
-
31
-
32
-
33
-
34
-
35
-
36
-
37
-
38
-
39
-
40
-
41
-
42
-
43
-
44
-
45
-
46
-
47
-
48
-
49
-
50
-
51
-
52
-
53
-
54
-
55
-
56
-
57
-
58
-
59
-
60
-
61
-
62
-
63
-
64
-
65
-
66
-
67
-
68
-
69
-
70
-
71
-
72
-
73
-
74
-
75
-
76
-
77
-
78
-
79
-
80
-
81
-
82
-
83
-
84
-
85
-
86
-
87
-
88
-
89
-
90
-
91
-
92
-
 93
93 -
 94
94 -
 95
95 -
 96
96 -
 97
97 -
 98
98 -
 99
99 -
 100
100 -
 101
101 -
 102
102
 |
 |
