Konica Minolta Kodak i4600 User Guide - Page 49
Troubleshooting, Problem solving, Contents
 |
View all Konica Minolta Kodak i4600 manuals
Add to My Manuals
Save this manual to your list of manuals |
Page 49 highlights
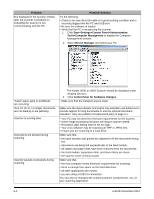
6 Troubleshooting Contents Problem solving 6-1 Indicator lights and error codes 6-3 Upgrading software 6-4 Contacting Service 6-4 Problem solving Use the chart below as a guide to check possible solutions to problems you may encounter when using the Kodak i4000 Series Scanner. Problem Possible Solution Documents are jamming or multiple documents are feeding Make sure that: • all documents meet specifications for size, weight, and type, etc. as outlined in Appendix A, Specifications. • all staples and paper clips have been removed from the documents. • all rollers and tires are clean and the separation roller and feed module are properly installed. See the procedures in Chapter 5, Maintenance. To remove a document jam: • Remove any documents from the feeder area. • Open the scanner cover. • Locate the jammed document(s) and remove it. • Close the scanner cover and resume scanning. U9 (document jam) is being displayed in the function window and paper is stopping in the transport, but is not jamming. Verify that the Document Management: Maximum Length option on the Device-General tab (TWAIN Datasource) or the Longest Document option on the Scanner tab (ISIS Driver) is set to longer than the longest document being scanned. The default is 43.2 cm (17 inches). The scanner will not scan/ feed documents Make sure that: • the power cord is plugged in and the power is on. • the power button has been pushed on and the green LED is lit. • the scanner cover is completely closed. • documents are making contact with the feed module and are covering the paper present sensor. • the last document in the stack does not have black in the area covering the paper present sensor in the input elevator. • documents meet specifications for size, weight, and type, etc. • for thicker documents, toggle the gap release toggle switch during feeding. • you check the feed module and separation roller for signs of wear, and replace these parts if necessary. You can also power the scanner down and power it up again. Image quality is poor or has decreased Make sure that the scanner and imaging guides are clean. Refer to Chapter 5, Maintenance. A-61651 November 2010 6-1
-
 1
1 -
2
-
3
-
4
-
5
-
6
-
7
-
8
-
9
-
10
-
11
-
12
-
13
-
14
-
15
-
16
-
17
-
18
-
19
-
20
-
21
-
22
-
23
-
24
-
25
-
26
-
27
-
28
-
29
-
30
-
31
-
32
-
33
-
34
-
35
-
36
-
37
-
38
-
39
-
40
-
41
-
42
-
43
-
 44
44 -
 45
45 -
 46
46 -
 47
47 -
 48
48 -
 49
49 -
 50
50 -
 51
51 -
 52
52 -
 53
53 -
 54
54 -
55
-
56
-
57
-
58
-
59
 |
 |
