Konica Minolta Kodak i4600 User Guide - Page 7
Stop/Pause button, Power button, Input Elevator side guides, Input Elevator, extender
 |
View all Konica Minolta Kodak i4600 manuals
Add to My Manuals
Save this manual to your list of manuals |
Page 7 highlights
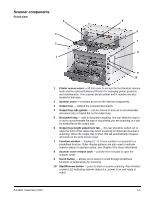
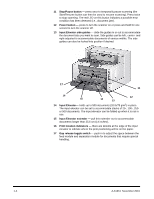
11 Stop/Pause button - press once to temporarily pause scanning (the Start/Resume button can then be used to resume scanning). Press twice to stop scanning. The red LED on this button indicates a possible error condition has been detected (i.e., document jam). 12 Power button - press to turn the scanner on or press and hold for one second to turn the scanner off. 13 Input Elevator side guides - slide the guides in or out to accommodate the document size you want to scan. Side guides can be left-, center- and right-adjusted to accommodate documents of various widths. The side guides can also be locked into position if desired. 17 11 16 15 12 14 13 14 Input Elevator- holds up to 500 documents (20 lb/75 g/m2) in place. The input elevator can be set to accommodate stacks of 25-, 100-, 250or 500-documents. The input elevator can be folded up when it is not in use. 15 Input Elevator extender - pull this extender out to accommodate documents longer than 35.6 cm (14 inches). 16 Print location indicators - there are detents at the edge of the input elevator to indicate where the print positioning will be on the paper. 17 Gap release toggle switch - push in to adjust the space between the feed module and separation module for documents that require special handling. 1-4 A-61651 November 2010
-
 1
1 -
 2
2 -
 3
3 -
 4
4 -
 5
5 -
 6
6 -
 7
7 -
 8
8 -
 9
9 -
 10
10 -
 11
11 -
 12
12 -
13
-
14
-
15
-
16
-
17
-
18
-
19
-
20
-
21
-
22
-
23
-
24
-
25
-
26
-
27
-
28
-
29
-
30
-
31
-
32
-
33
-
34
-
35
-
36
-
37
-
38
-
39
-
40
-
41
-
42
-
43
-
44
-
45
-
46
-
47
-
48
-
49
-
50
-
51
-
52
-
53
-
54
-
55
-
56
-
57
-
58
-
59
 |
 |
