Konica Minolta Kodak i780 Image Processing Guide - Page 26
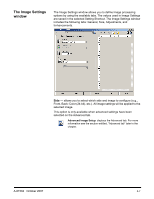
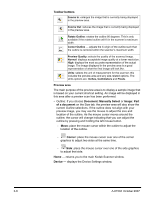
Toolbar buttons, Preview area, Document: Manually Select, Image: Part, of a document, Corner, Device
 |
View all Konica Minolta Kodak i780 manuals
Add to My Manuals
Save this manual to your list of manuals |
Page 26 highlights
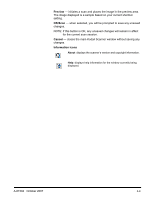
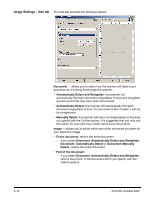
Toolbar buttons Zooms In: enlarges the image that is currently being displayed in the preview area. Zooms Out: reduces the image that is currently being displayed in the preview area. Rotate Outline: rotates the outline 90 degrees. This is only available if the rotated outline will fit in the scanner's maximum width. Center Outline - adjusts the X origin of the outline such that the outline is centered within the scanner's maximum width. Preview Quality: selects the quality of the scanned image. Normal: displays acceptable image quality at a lower resolution. High: displays the most accurate representation of the actual image. The image displayed in the preview area is a good representation of what the final image will look like. Units: selects the unit of measurement for the scanner; this includes the preview area and any size-related options. The Units options are: Inches, Centimeters and Pixels. Preview area The main purpose of the preview area is to display a sample image that is based on your current shortcut setting. An image will be displayed in this area after a preview scan has been performed. • Outline: If you choose Document: Manually Select or Image: Part of a document on the Size tab, the preview area will also show the current Outline selections. If the outline does not align with your preview image, you may use the mouse to adjust the size and location of the outline. As the mouse cursor moves around the outline, the cursor will change indicating that you can adjust the outline by pressing and holding the left mouse button. - Move: place the mouse cursor within the outline to adjust the location of the outline. - Corner: place the mouse cursor over one of the corner graphics to adjust two sides at the same time. - Side: place the mouse cursor over one of the side graphics to adjust that side. Home - returns you to the main Kodak Scanner window. Device - displays the Device Settings window. 3-8 A-61504 October 2007
-
 1
1 -
2
-
3
-
4
-
5
-
6
-
7
-
8
-
9
-
10
-
11
-
12
-
13
-
14
-
15
-
16
-
17
-
18
-
19
-
20
-
 21
21 -
 22
22 -
 23
23 -
 24
24 -
 25
25 -
 26
26 -
 27
27 -
 28
28 -
 29
29 -
 30
30 -
 31
31 -
32
-
33
-
34
-
35
-
36
-
37
-
38
-
39
-
40
-
41
-
42
-
43
-
44
-
45
-
46
-
47
-
48
-
49
-
50
-
51
-
52
-
53
-
54
-
55
-
56
-
57
-
58
-
59
-
60
-
61
-
62
-
63
-
64
-
65
-
66
-
67
-
68
-
69
-
70
-
71
-
72
-
73
-
74
-
75
-
76
-
77
-
78
-
79
-
80
-
81
-
82
-
83
-
84
-
85
 |
 |
