Konica Minolta Kodak i780 Image Processing Guide - Page 31
Document: Automatically Detect and Straighten - scanner manual
 |
View all Konica Minolta Kodak i780 manuals
Add to My Manuals
Save this manual to your list of manuals |
Page 31 highlights
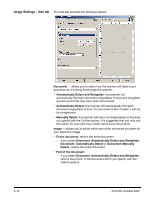
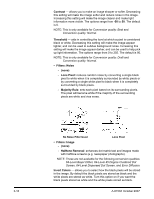
Outline - allows you to select the location and size to use for creating your electronic image. The preview area will show the outline. • Origin (x, y): - if you select Document: Automatically Detect and Straighten (x) is the distance from the left edge of the document and (y) is the distance from the top edge of the document. - if you select Document: Manually Select, (x) is the distance from the left edge of the scanner's paper path and (y) is the distance from the first portion of the document detected by the scanner. • Size (W, H): - if you select Document: Automatically Detect and Straighten or Document: Manually Select, this is the width and height of the electronic image. NOTE: The electronic image may be shorter than you specified if the outline goes beyond the end of the scanned document. • Predefined sizes: provides a list of commonly used paper sizes. Selecting an item in this list will automatically set the size of the outline to that paper's size. Custom will be displayed when the outline size does not match any sizes in this list. NOTE: You can also adjust the outline displayed in the preview area using your mouse. Border - allows you to select what action to perform on the edges of your electronic image. • (none) • Add: includes up to approximately 0.1 inches of border around all of the image edges. NOTE: This option is only available for the following selections: when both Document: Automatically Detect and Straighten and Image: Part of Document are selected; Document: Automatically Detect; or Document: Manually Select. • Remove: produces an image that contains just the document by eliminating any residual border. Residual border can be caused by variations in a document edge; for example, when a document is not a perfect rectangle and/or was fed crooked. NOTES: - While this option will not remove large amounts of residual border, there is a possibility that a small amount of the document will be lost. - This option is only available when both Document: Automatically Detect and Straighten and Image: Entire Document are selected. A-61504 October 2007 3-13
-
 1
1 -
2
-
3
-
4
-
5
-
6
-
7
-
8
-
9
-
10
-
11
-
12
-
13
-
14
-
15
-
16
-
17
-
18
-
19
-
20
-
21
-
22
-
23
-
24
-
25
-
 26
26 -
 27
27 -
 28
28 -
 29
29 -
 30
30 -
 31
31 -
 32
32 -
 33
33 -
 34
34 -
 35
35 -
 36
36 -
37
-
38
-
39
-
40
-
41
-
42
-
43
-
44
-
45
-
46
-
47
-
48
-
49
-
50
-
51
-
52
-
53
-
54
-
55
-
56
-
57
-
58
-
59
-
60
-
61
-
62
-
63
-
64
-
65
-
66
-
67
-
68
-
69
-
70
-
71
-
72
-
73
-
74
-
75
-
76
-
77
-
78
-
79
-
80
-
81
-
82
-
83
-
84
-
85
 |
 |
