Konica Minolta bizhub C3100P bizhub C3100P Print Functions User Guide - Page 67
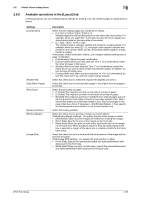
Available operations in the [Cover Mode] tab, Each Job], [Header Each Copy]
 |
View all Konica Minolta bizhub C3100P manuals
Add to My Manuals
Save this manual to your list of manuals |
Page 67 highlights
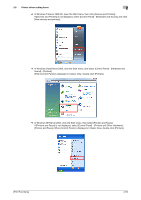
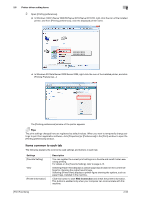
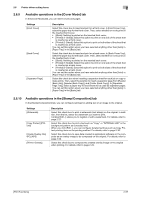
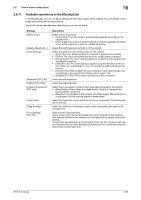
2.6 Printer driver setting items 2 2.6.9 Available operations in the [Cover Mode] tab In the [Cover Mode] tab, you can insert covers and pages. Settings [Front Cover] [Back Cover] [Separator Page] Description Select this check box to insert and print on a front cover. In [Front Cover Tray], select the paper tray for the front cover. Then, select whether or not to print on the inserted front cover. • [Blank]: Nothing is printed on the inserted front cover. • [Printed (1-Sided)]: Select this option to print on one side of the sheet that is inserted as a front cover. • [Printed (2-Sided)]: Select this option to print on both sides of the sheet that is inserted as a front cover. You can set this option when you have selected anything other than [Auto] in [Paper Tray] in the [Basic] tab. Select this check box to insert and print on a back cover. In [Back Cover Tray], select the paper tray for the back cover. Then, select whether or not to print on the inserted back cover. • [Blank]: Nothing is printed on the inserted back cover. • [Printed (1-Sided)]: Select this option to print on one side of the sheet that is inserted as a back cover. • [Printed (2-Sided)]: Select this option to print on both sides of the sheet that is inserted as a back cover. You can set this option when you have selected anything other than [Auto] in [Paper Tray] in the [Basic] tab. Select this check box when inserting a separator sheet for each job or copy to make prints. Then, select the position to insert a separator page from [Header (Each Job)], [Header (Each Copy)], and [Trailer (Each Copy)]. In [Separator Page Tray], select a paper tray to load sheets to be used as separator pages. You can set this option when you have selected anything other than [Auto] in [Paper Tray] in the [Basic] tab. 2.6.10 Available operations in the [Stamp/Composition] tab In the [Stamp/Composition] tab, you can configure settings for adding text or an image to the original. Settings [Watermark] [Copy Protect] (PCL only) [Create Overlay File] (PCL/XPS) [Print in Overlay] Description Select this check box to print a watermark (text stamp) on the original. In addition, from the list, select the watermark you want to print. Clicking [Edit...] allows you to register or edit a watermark. For details, refer to page 2-27. Select this check box to print a text such as "Copy" or "INTERNAL USE" in the background pattern as concealed text. When you click [Edit...], you can configure detailed settings such as Copy Protect printing items or the printing method. For details, refer to page 2-30. Select this check box to save data created in application software on the computer as an overlay image to be composed on the original. For details, refer to page 2-30. Select this check box to compose the created overlay image on the original when printing. For details, refer to page 2-29. [Print Functions] 2-57
-
 1
1 -
2
-
3
-
4
-
5
-
6
-
7
-
8
-
9
-
10
-
11
-
12
-
13
-
14
-
15
-
16
-
17
-
18
-
19
-
20
-
21
-
22
-
23
-
24
-
25
-
26
-
27
-
28
-
29
-
30
-
31
-
32
-
33
-
34
-
35
-
36
-
37
-
38
-
39
-
40
-
41
-
42
-
43
-
44
-
45
-
46
-
47
-
48
-
49
-
50
-
51
-
52
-
53
-
54
-
55
-
56
-
57
-
58
-
59
-
60
-
61
-
 62
62 -
 63
63 -
 64
64 -
 65
65 -
 66
66 -
 67
67 -
 68
68 -
 69
69 -
 70
70 -
 71
71 -
 72
72 -
73
-
74
-
75
-
76
-
77
-
78
-
79
-
80
-
81
-
82
-
83
-
84
-
85
-
86
-
87
-
88
-
89
-
90
-
91
-
92
-
93
-
94
-
95
-
96
-
97
-
98
-
99
-
100
-
101
-
102
-
103
-
104
-
105
-
106
-
107
-
108
-
109
-
110
-
111
-
112
-
113
-
114
 |
 |