Kyocera ECOSYS FS-1370DN FS-1370DN Operation Guide (Basic) - Page 58
Uninstalling Software (Windows PC), Allow, Remove Software, Uninstall, Finish, start, All Programs
 |
View all Kyocera ECOSYS FS-1370DN manuals
Add to My Manuals
Save this manual to your list of manuals |
Page 58 highlights
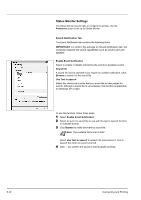
Uninstalling Software (Windows PC) The software can be uninstalled (removed) using the CD-ROM (Product Library) supplied with the printer. IMPORTANT On Macintosh computers, because the printer settings are specified using a PPD (PostScript Printer Description) file, the software cannot be uninstalled using the CD-ROM (Product Library). 1 Exit all active software applications. 2 Insert the enclosed CD-ROM (Product Library) into the CD-ROM drive. In Windows 7, Windows Server 2008 and Windows Vista, the user account control window may appear. Click Allow. 3 Following the procedure used to install the printer driver, click Remove Software. The Kyocera Uninstaller wizard appears. 4 Select the software package to remove. 5 Click Uninstall. Note When KMnet Viewer or KM-NET for Direct Printing is installed, separate uninstallers are launched for each application. Proceed with the uninstallation steps for each application as directed by the on-screen instructions. The uninstaller starts. 6 When Uninstall complete screen appears, click Finish. 7 If Restart Your System screen appears, select whether you restart your computer or not, click Finish. Note The software can be uninstalled from the Start menu. Start the uninstaller by clicking start > All Programs > Kyocera > Uninstall Kyocera Product Library, and uninstall the software. 3-24 Connecting and Printing
-
 1
1 -
2
-
3
-
4
-
5
-
6
-
7
-
8
-
9
-
10
-
11
-
12
-
13
-
14
-
15
-
16
-
17
-
18
-
19
-
20
-
21
-
22
-
23
-
24
-
25
-
26
-
27
-
28
-
29
-
30
-
31
-
32
-
33
-
34
-
35
-
36
-
37
-
38
-
39
-
40
-
41
-
42
-
43
-
44
-
45
-
46
-
47
-
48
-
49
-
50
-
51
-
52
-
 53
53 -
 54
54 -
 55
55 -
 56
56 -
 57
57 -
 58
58 -
 59
59 -
 60
60 -
 61
61 -
 62
62 -
 63
63 -
64
-
65
-
66
-
67
-
68
-
69
-
70
-
71
-
72
-
73
-
74
-
75
-
76
-
77
-
78
-
79
-
80
-
81
-
82
-
83
-
84
-
85
-
86
-
87
-
88
-
89
-
90
-
91
-
92
-
93
-
94
-
95
-
96
 |
 |
