Kyocera KM-C3232E C2525E/C3225E/C3232E/C4035E Operation Guide Rev-1.0 (Advance - Page 33
Margin Mode, Margin on the Back Side
 |
View all Kyocera KM-C3232E manuals
Add to My Manuals
Save this manual to your list of manuals |
Page 33 highlights
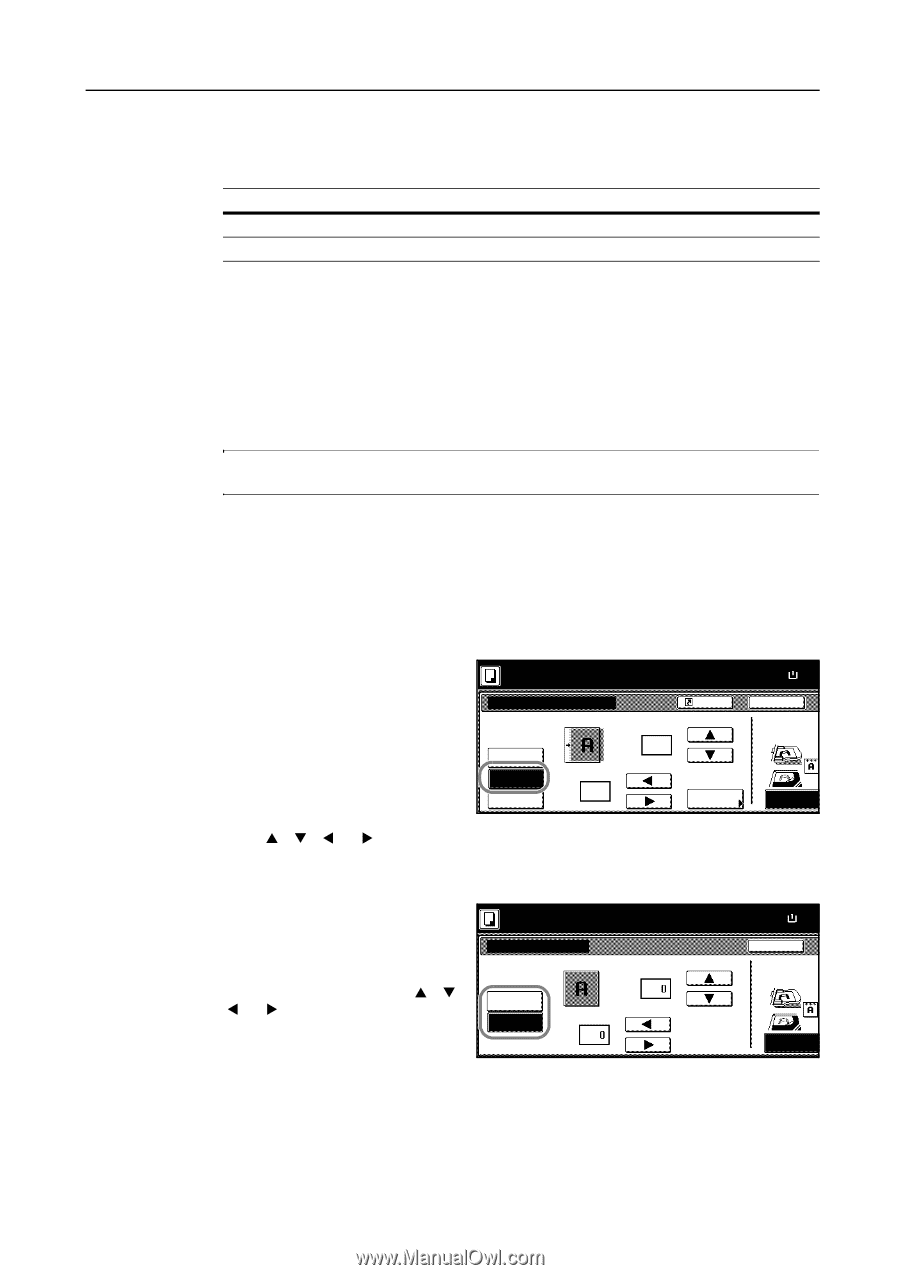
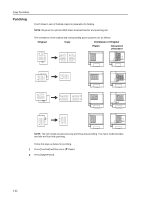
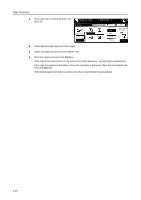
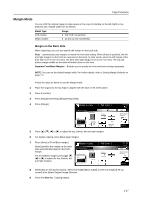
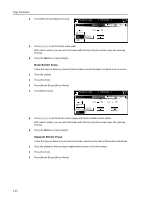
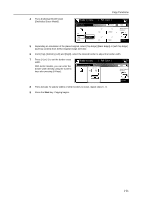
Copy Functions Margin Mode You can shift the original image to make space on the copy for binding on the left (right) or top (bottom) side. Margin widths are as follows. Model Type Inch models Metric models Range 0 - 3/4" (1/8" increments) 0 - 18 mm (1 mm increments) Margin on the Back Side When duplexing, you can also specify the margin on the back side. Auto - automatically sets margins to match the front side setting. When [Auto] is specified, the left and right margins on the front are reversed on the back. In other words, when the left margin of the front side is set to 1/2" (10 mm), the back side right margin is set to 1/2" (10 mm). The top and bottom margin widths on the back will match those on the front. Separate Front/Back Margins - Enables you to specify the front and back settings separately. NOTE: You can set the default margin width. For further details, refer to Setting Margin Defaults on page 7-9. Follow the steps as below to use the Margin mode. 1 Place the original so the top edge is aligned with the back or left of the platen. 2 Press [Function]. 3 Press [Margin/Centering] ([Margin/Imag.Shift]). 4 Press [Margin]. Ready to copy. ( Full-Color ) Margin/Centering Front page Off Margin Auto Center ( 0~¾) ¼ Left . " Shortcut ( 0~¾) .0 " Auto Back page margin 5 Press [S], [T], [W] or [X] to adjust the top, bottom, left and right margins. 6 For duplex copying, press [Back page margin]. 7 Press [Auto] or [Front/Back margin]. Ready to copy. ( Full-Color ) [Auto] specifies the margin on the back side automatically based on the front margin. Back page margin Back page ( 0~¾) For [Front/Back margin], press [S], [T], " [W] or [X] to adjust the top, bottom, left Auto and right margins. Front/Back margin ( 0~¾) " Paper Size 11×8 100% Back Select Original I Direction. Top Edge Paper Size 11×8 100% Back Select Original Im Direction. Top Edge 8 Depending on the placed original, select [Top Edge] ([Back Edge]) or [Left Top Edge] ([Left top corner]) from Select Original Image Direction. 9 Press the Start key. Copying begins. 1-17
-
 1
1 -
2
-
3
-
4
-
5
-
6
-
7
-
8
-
9
-
10
-
11
-
12
-
13
-
14
-
15
-
16
-
17
-
18
-
19
-
20
-
21
-
22
-
23
-
24
-
25
-
26
-
27
-
 28
28 -
 29
29 -
 30
30 -
 31
31 -
 32
32 -
 33
33 -
 34
34 -
 35
35 -
 36
36 -
 37
37 -
 38
38 -
39
-
40
-
41
-
42
-
43
-
44
-
45
-
46
-
47
-
48
-
49
-
50
-
51
-
52
-
53
-
54
-
55
-
56
-
57
-
58
-
59
-
60
-
61
-
62
-
63
-
64
-
65
-
66
-
67
-
68
-
69
-
70
-
71
-
72
-
73
-
74
-
75
-
76
-
77
-
78
-
79
-
80
-
81
-
82
-
83
-
84
-
85
-
86
-
87
-
88
-
89
-
90
-
91
-
92
-
93
-
94
-
95
-
96
-
97
-
98
-
99
-
100
-
101
-
102
-
103
-
104
-
105
-
106
-
107
-
108
-
109
-
110
-
111
-
112
-
113
-
114
-
115
-
116
-
117
-
118
-
119
-
120
-
121
-
122
-
123
-
124
-
125
-
126
-
127
-
128
-
129
-
130
-
131
-
132
-
133
-
134
-
135
-
136
-
137
-
138
-
139
-
140
-
141
-
142
-
143
-
144
-
145
-
146
-
147
-
148
-
149
-
150
-
151
-
152
-
153
-
154
-
155
-
156
-
157
-
158
-
159
-
160
-
161
-
162
-
163
-
164
-
165
-
166
-
167
-
168
-
169
-
170
-
171
-
172
-
173
-
174
-
175
-
176
-
177
-
178
-
179
-
180
-
181
-
182
-
183
-
184
-
185
-
186
-
187
-
188
-
189
-
190
-
191
-
192
-
193
-
194
-
195
-
196
-
197
-
198
-
199
-
200
-
201
-
202
-
203
-
204
-
205
-
206
-
207
-
208
-
209
-
210
-
211
-
212
-
213
-
214
-
215
-
216
-
217
-
218
-
219
-
220
-
221
-
222
-
223
-
224
-
225
-
226
-
227
-
228
-
229
-
230
-
231
-
232
-
233
-
234
-
235
-
236
-
237
-
238
-
239
-
240
-
241
-
242
-
243
-
244
-
245
-
246
-
247
-
248
-
249
-
250
-
251
-
252
-
253
-
254
-
255
-
256
-
257
-
258
-
259
-
260
-
261
-
262
-
263
-
264
-
265
-
266
-
267
-
268
-
269
-
270
-
271
-
272
-
273
-
274
-
275
-
276
-
277
-
278
-
279
-
280
-
281
-
282
-
283
-
284
-
285
-
286
-
287
-
288
-
289
-
290
-
291
-
292
-
293
-
294
-
295
-
296
-
297
-
298
-
299
-
300
-
301
-
302
-
303
-
304
-
305
-
306
-
307
-
308
-
309
-
310
-
311
-
312
-
313
-
314
-
315
-
316
-
317
-
318
-
319
-
320
-
321
-
322
-
323
-
324
-
325
-
326
-
327
-
328
-
329
-
330
-
331
-
332
-
333
-
334
-
335
-
336
-
337
-
338
-
339
-
340
-
341
-
342
-
343
-
344
-
345
-
346
-
347
-
348
-
349
-
350
-
351
-
352
-
353
-
354
-
355
-
356
-
357
-
358
-
359
-
360
-
361
-
362
-
363
-
364
-
365
-
366
-
367
-
368
-
369
-
370
-
371
-
372
-
373
-
374
 |
 |