LG 27GR95QE-B Owners Manual - Page 16
USING THE REMOTE CONTROL, Replacing the Remote Control Battery
 |
View all LG 27GR95QE-B manuals
Add to My Manuals
Save this manual to your list of manuals |
Page 16 highlights
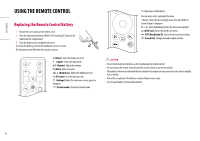
ENGLISH USING THE REMOTE CONTROL Replacing the Remote Control Battery 1 Remove the screw and open the battery cover. 2 Place the replacement battery (CR2025/ 3 V) matching direction the label inside the compartment. 3 Close the battery cover and tighten the screw. To remove the battery, perform the installation actions in reverse. The illustrations may differ from the actual accessories. 1 2 (Power) Turns the monitor on or off. (Input) Selects the input mode. (Volume) Adjusts the volume. (Mute) Mute all sounds. (Brightness) Adjusts the brightness level. (Previous) Go to the previous step. Makes the main menu screen appear or disappear. (Reader mode) Changes to Reader mode. (Direction and OK buttons) You can move, select, and adjust the menu. * (Down): Enters the [Accessibility] menu if no other OSD (On Screen Display) is displayed. (User-defined Key) Enters the menu user specified. (OLED Care) Enters the [OLED Care] menu. ([DTS Headphone:X]) Selects the desired sound setting. (Sound Out) Changes the audio output method. CAUTION •• Do not mix old and new batteries, as this may damage the remote control. •• Be sure to point the remote control toward the remote control sensor on the monitor. •• The product's internal and external batteries should not be exposed to excessive heat such as direct sunlight, fire, or the like. •• Risk of fire or explosion if the battery is replaced by an incorrect type. •• Do not ingest battery. Chemical burn hazard. 16
-
 1
1 -
2
-
3
-
4
-
5
-
6
-
7
-
8
-
9
-
10
-
 11
11 -
 12
12 -
 13
13 -
 14
14 -
 15
15 -
 16
16 -
 17
17 -
 18
18 -
 19
19 -
 20
20 -
 21
21 -
22
-
23
-
24
-
25
-
26
-
27
 |
 |
