LG 50144803 User Guide - Page 34
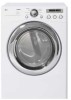
LG 50144803 - DLE5955W 27in Electric Dryer Manual
 |
UPC - 048231009157
View all LG 50144803 manuals
Add to My Manuals
Save this manual to your list of manuals |
Page 34 highlights
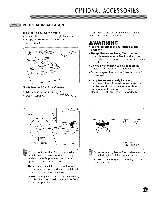
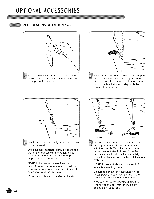
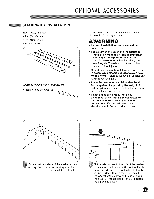
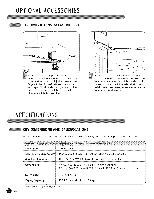
OPTIONAL ACCESSORIES PEDESTAL iNSTALLATiON (cont.) Make sure the side surface of the appliance is clean and dry. Remove paper backing from the tape on the bracket. Position the bracket as shown. The bent part of the bracket should rest along the edge of the pedestal, and the holes in the bottom part of the bracket should align with the holes in the pedestal. J J oJ Install 2 screws to securely attach the bracket to the pedestal. Once properly attached, firmly press the top part of the bracket with the double-sided tape to the side of the appliance. Repeat steps 2-4 to attach the other brackets. NOTE: If the brackets are not installed properly, noise and vibration may result. Be sure to remove paper backing and to use all screws to install the brackets. Move the appliance to the desired location. Raise Lower _J Loosen the Iocknuts on all 4 leveling feet of the pedestal until you can turn them with the wrench. Turn clockwise to raise or counterclockwise to lower. Once the pedestal is level and all 4 feet are solidly against the floor, securely tighten all Iocknuts by hand. NOTE: Noise and vibration may result if Iocknuts are not tightened. Be sure to connect the appliances to all water, power, or gas lines and draining or venting connections before operation. If there is excessive vibration during the first operation after installation, slightly adjust the leveling feet. 34
-
 1
1 -
2
-
3
-
4
-
5
-
6
-
7
-
8
-
9
-
10
-
11
-
12
-
13
-
14
-
15
-
16
-
17
-
18
-
19
-
20
-
21
-
22
-
23
-
24
-
25
-
26
-
27
-
28
-
 29
29 -
 30
30 -
 31
31 -
 32
32 -
 33
33 -
 34
34 -
 35
35 -
 36
36 -
 37
37 -
 38
38 -
 39
39 -
40
-
41
-
42
-
43
-
44
-
45
-
46
-
47
-
48
-
49
-
50
-
51
-
52
-
53
-
54
-
55
-
56
-
57
-
58
-
59
-
60
-
61
-
62
-
63
-
64
-
65
-
66
-
67
-
68
-
69
-
70
-
71
-
72
-
73
-
74
-
75
-
76
-
77
-
78
-
79
-
80
 |
 |
