LG MU-42PM12X Service Manual - Page 8
Adjustment Instructions - setup
 |
View all LG MU-42PM12X manuals
Add to My Manuals
Save this manual to your list of manuals |
Page 8 highlights
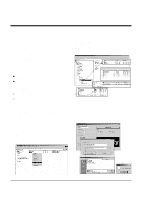
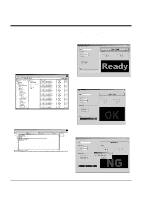
ADJUSTMENT INSTRUCTIONS 1. Application Object These instructions apply to the RF-043E Chassis. 2. Specification (1) Because this is not a hot chassis, it is not necessary to use an isolation transformer. However, the use of isolation transformer will help protect test equipment. (2) Adjustment must be done in the correct order. (3) The adjustment must be performed in the circumstance of 25±5°C of temperature and 65±10% of relative humidity if there is no specific designation otherwise.. (4) The input voltage of the receiver must keep 100~220V, 50/60Hz. (5) The receiver must be operated for about 15 minutes prior to adjustments. O The unit must be Heat Run with a RGB Full pattern, prior to adjustment. O Enter into HEAT-RUN MODE 1) Press the POWER ON KEY on Service R/C. 2) OSD display and screen display 100% full WHITE PATTERN. [ Set is activated HEAT-RUN without signal generator in this mode. [ Single color pattern(RED/BLUE/GREEN) of HEAT-RUN mode can be used to check PANEL. Caution) If you turn on a still screen for more than 20 minutes (Especially digital pattern, cross hatch pattern), an afterimage may occur in the black level part of the screen. 4. HDCP Download 4-1. Setting Up the LGIDS (1) Click on 'setup' to install in your directory. (2) After installation has completed, check if the file shown on (Fig. 2) has been created. (3) Copy the KEY from source CD into the HDCP directory which was installed just now. (DVI_orderNo_2003_data) (Fig. 2) (4) After running HDCP(application program) which is inside the HDCP directory, setup the Communication. Port : COM1(modification possible) BaudRate : 115200 3. Setting Up the LGIDS (1) Install the LGIDS. (idsinst.exe) After installation has completed, check if the file shown in (Fig. 1) has been created. (2) Right click on 'LGIDS' and select 'Create Shortcut' Then move the shortcut icon onto the desktop. (3) Double-click on the 'LGIDS' icon on the desktop to execute the program. 4-2. KEY Generation (Fig. 1) -8- (Fig. 3)
-
 1
1 -
2
-
 3
3 -
 4
4 -
 5
5 -
 6
6 -
 7
7 -
 8
8 -
 9
9 -
 10
10 -
 11
11 -
 12
12 -
 13
13 -
14
-
15
-
16
-
17
-
18
-
19
-
20
-
21
-
22
-
23
-
24
-
25
-
26
-
27
-
28
-
29
-
30
-
31
-
32
-
33
-
34
-
35
-
36
-
37
-
38
-
39
-
40
-
41
-
42
 |
 |
