LG N1T1DD1W User Manual - Page 30
Remote Network Drive, Remote Network Drive allows you to use the network folder anywhere, as if
 |
View all LG N1T1DD1W manuals
Add to My Manuals
Save this manual to your list of manuals |
Page 30 highlights
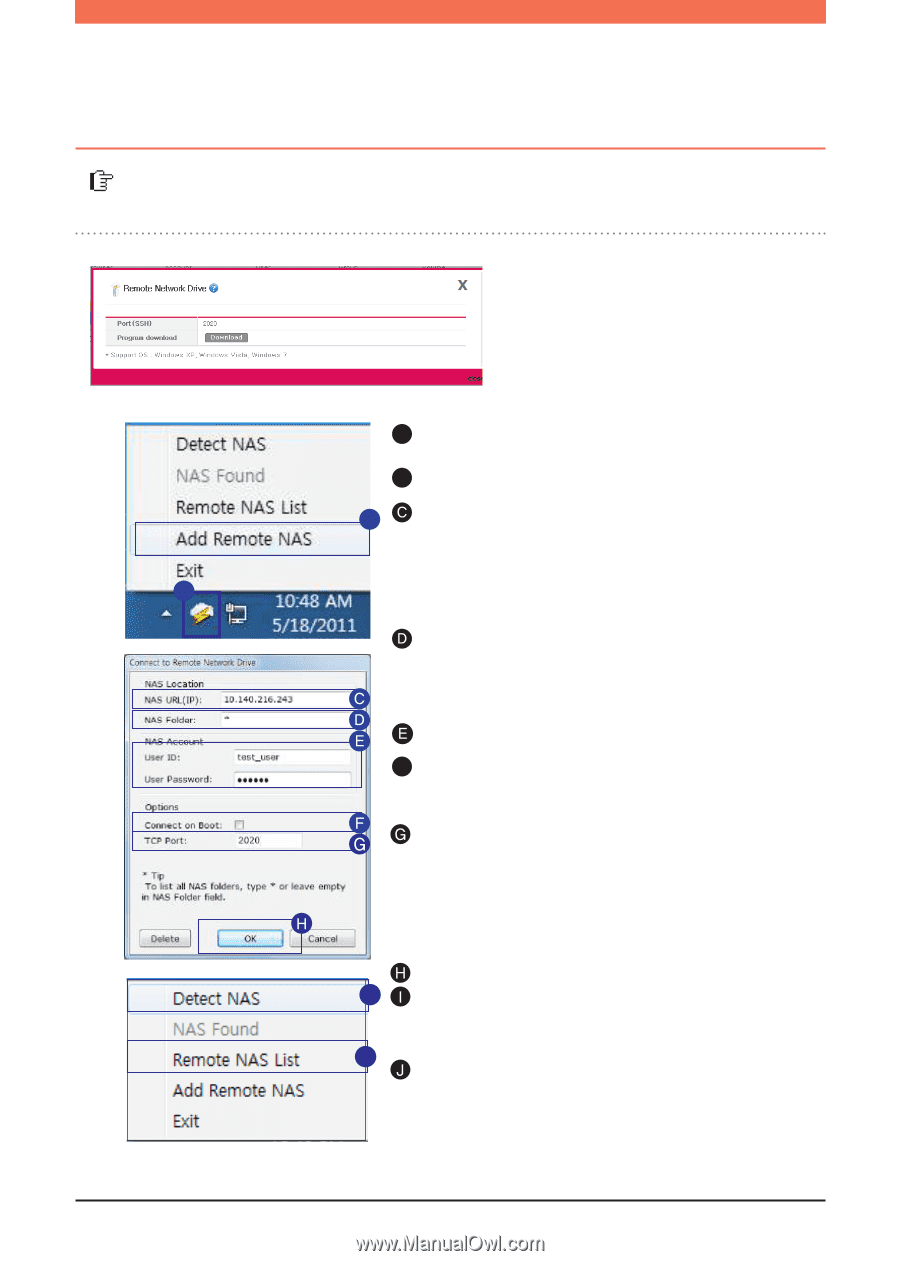
File Uploading and Downloading l Remote Network Drive Remote Network Drive allows you to use the network folder anywhere, as if you are in your home, through the Window Explorer. - Connect to Network Storage Web Menu -> Configuration -> Network Service Setting -> click on 'Remote Network Drive' - Click Download to download and install the latest version of remote window browser. A Right click on the Window's Remote Network Drive icon. B Click on 'Add Remote NAS'. B Enter Network Storage domain address or the IP address. ※ IP Address : Enter the authorized IP of the Network Storage. A ※ Domain : You can register the Domain Address of the Network Storage through the 70p DDNS setting. Enter the name of the network folder you wish to connect to. ※ If the name isn't entered, all the registered folder will be shown. Type in the ID and Password used in Network Storage. F Connect on Boot : When the PC is started or waking from the sleep mode, it automatically reconnects to the corresponding NAS. Type in the Port Number. (Default : 2020) ※ If you want to remotely connect, you must set the UPnP or Port Forwarding on your sharing device. Refer to 71p for UPnP setting for NAS, and for sharing device Port Forwarding setting refer to 97p~99p. Click 'OK' I Click 'Detect NAS' to search for registered Network Storages within the internal and external networks. J You can connect to the searched Network Storage folder in the external network by clicking 'Remote NAS List' ※ In 'Local NAS Found,' it shows the connected Network Storage of internal(LAN) and external(WAN) networks. 30
-
 1
1 -
2
-
3
-
4
-
5
-
6
-
7
-
8
-
9
-
10
-
11
-
12
-
13
-
14
-
15
-
16
-
17
-
18
-
19
-
20
-
21
-
22
-
23
-
24
-
 25
25 -
 26
26 -
 27
27 -
 28
28 -
 29
29 -
 30
30 -
 31
31 -
 32
32 -
 33
33 -
 34
34 -
 35
35 -
36
-
37
-
38
-
39
-
40
-
41
-
42
-
43
-
44
-
45
-
46
-
47
-
48
-
49
-
50
-
51
-
52
-
53
-
54
-
55
-
56
-
57
-
58
-
59
-
60
-
61
-
62
-
63
-
64
-
65
-
66
-
67
-
68
-
69
-
70
-
71
-
72
-
73
-
74
-
75
-
76
-
77
-
78
-
79
-
80
-
81
-
82
-
83
-
84
-
85
-
86
-
87
-
88
-
89
-
90
-
91
-
92
-
93
-
94
-
95
-
96
-
97
-
98
-
99
-
100
-
101
-
102
-
103
 |
 |