Lenovo Erazer X510 Lenovo Erazer X510 Hardware Maintenance Manual - Page 38
Line up the locking bracket with mounting holes, then reattach the locking bracket to
 |
View all Lenovo Erazer X510 manuals
Add to My Manuals
Save this manual to your list of manuals |
Page 38 highlights
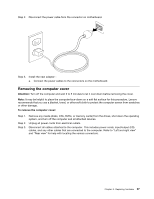
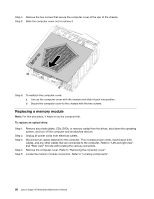
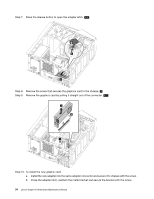
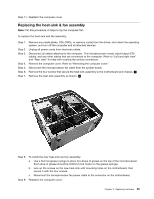
Step 3. Step 4. Step 5. Step 6. Step 7. Disconnect all cables attached to the computer. This includes power cords, input/output (I/O) cables, and any other cables that are connected to the computer. Refer to "Left and right view" and "Rear view" for help with locating the various connectors. Remove the computer cover. Refer to "Removing the computer cover". Remove the front bezel. Refer to "Removing the front bezel". Disconnect the data and power cables from the rear of the optical drive. 1 Press the release button and push the optical drive straight out of the front of the chassis. 2 3 1 2 3 Step 8. Remove the locking bracket from the optical disk drive as shown. Step 9. To install the new optical drive: a. Line up the locking bracket with mounting holes, then reattach the locking bracket to the optical disk drive. b. Slide the new optical drive into the bay from the front until it snaps into position. 32 Lenovo Erazer X510Hardware Maintenance Manual
-
 1
1 -
2
-
3
-
4
-
5
-
6
-
7
-
8
-
9
-
10
-
11
-
12
-
13
-
14
-
15
-
16
-
17
-
18
-
19
-
20
-
21
-
22
-
23
-
24
-
25
-
26
-
27
-
28
-
29
-
30
-
31
-
32
-
 33
33 -
 34
34 -
 35
35 -
 36
36 -
 37
37 -
 38
38 -
 39
39 -
 40
40 -
 41
41 -
 42
42 -
 43
43 -
44
-
45
-
46
-
47
-
48
-
49
-
50
-
51
-
52
-
53
-
54
-
55
-
56
-
57
-
58
-
59
 |
 |
