Lenovo Erazer X510 Lenovo Erazer X510 Hardware Maintenance Manual - Page 42
Replacing an Intel CPU
 |
View all Lenovo Erazer X510 manuals
Add to My Manuals
Save this manual to your list of manuals |
Page 42 highlights
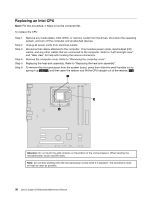
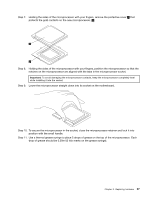
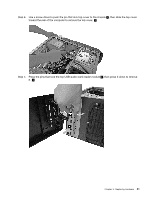
Replacing an Intel CPU Note: For this procedure, it helps to lay the computer flat. To replace the CPU Step 1. Step 2. Step 3. Step 4. Step 5. Step 6. Remove any media (disks, CDs, DVDs, or memory cards) from the drives, shut down the operating system, and turn off the computer and all attached devices. Unplug all power cords from electrical outlets. Disconnect all cables attached to the computer. This includes power cords, input/output (I/O) cables, and any other cables that are connected to the computer. Refer to "Left and right view" and "Rear view" for help with locating the various connectors. Remove the computer cover. Refer to "Removing the computer cover". Replacing the heat-sink assembly. Refer to "Replacing the heat-sink assembly". To remove the microprocessor from the system board, press then slide the small handles out to spring it up 1 2 3 4 , and then open the retainer and lift the CPU straight out of the retainer. 5 6 Attention: Do not touch the gold contacts on the bottom of the microprocessor. When handing the microprocessor, touch only the sides. Note: Do not drop anything onto the microprocessor socket while it is exposed. The socket pins must be kept as clean as possible. 36 Lenovo Erazer X510Hardware Maintenance Manual
-
 1
1 -
2
-
3
-
4
-
5
-
6
-
7
-
8
-
9
-
10
-
11
-
12
-
13
-
14
-
15
-
16
-
17
-
18
-
19
-
20
-
21
-
22
-
23
-
24
-
25
-
26
-
27
-
28
-
29
-
30
-
31
-
32
-
33
-
34
-
35
-
36
-
 37
37 -
 38
38 -
 39
39 -
 40
40 -
 41
41 -
 42
42 -
 43
43 -
 44
44 -
 45
45 -
 46
46 -
 47
47 -
48
-
49
-
50
-
51
-
52
-
53
-
54
-
55
-
56
-
57
-
58
-
59
 |
 |
