Lenovo Horizon 2 27 Table PC Lenovo Horizon 2 27 All-In-One PC Hardware Mainte - Page 29
screwdriverheadbeforeproceeding.
 |
View all Lenovo Horizon 2 27 Table PC manuals
Add to My Manuals
Save this manual to your list of manuals |
Page 29 highlights
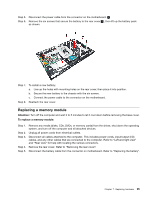
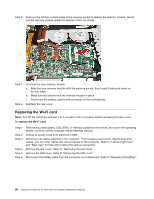
Step 4. For this procedure it requires using a flat head screw driver. Use a piece of soft clothes to wrap the screw driver head before proceeding. Step 5. The front panel and the rear cover are pined together, use the wrapped screw driver to push into the hole as illustrated to force the front panel separating from the rear cover. For this procedure it might requires using some strengthens while pushing. 1 Working along the gap opened in-between the front panel and the rear cover gently to separating the front panel from rear cover. 2 Chapter 7. Replacing hardware 23
-
 1
1 -
2
-
3
-
4
-
5
-
6
-
7
-
8
-
9
-
10
-
11
-
12
-
13
-
14
-
15
-
16
-
17
-
18
-
19
-
20
-
21
-
22
-
23
-
 24
24 -
 25
25 -
 26
26 -
 27
27 -
 28
28 -
 29
29 -
 30
30 -
 31
31 -
 32
32 -
 33
33 -
 34
34 -
35
-
36
-
37
-
38
-
39
-
40
-
41
-
42
-
43
-
44
-
45
-
46
-
47
-
48
-
49
 |
 |

Step4.Forthisprocedureitrequiresusingaflatheadscrewdriver.Useapieceofsoftclothestowrapthe
screwdriverheadbeforeproceeding.
Step5.Thefrontpanelandtherearcoverarepinedtogether,usethewrappedscrewdrivertopushintothe
holeasillustratedtoforcethefrontpanelseparatingfromtherearcover.Forthisprocedureitmight
requiresusingsomestrengthenswhilepushing.
1
Workingalongthegapopenedin-betweenthe
frontpanelandtherearcovergentlytoseparatingthefrontpanelfromrearcover.
2
Chapter 7
.
Replacing hardware
23