Lenovo ThinkPad T40 Hardware Maintenance Manual - Page 60
combinations
 |
View all Lenovo ThinkPad T40 manuals
Add to My Manuals
Save this manual to your list of manuals |
Page 60 highlights
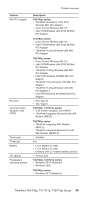
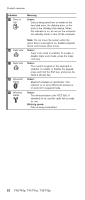
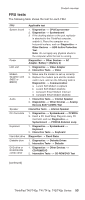
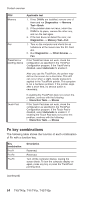
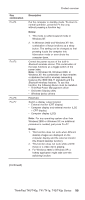
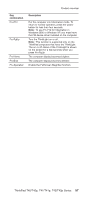
Product overview FRU Memory Fan TrackPoint or pointing device Applicable test 1. If two DIMMs are installed, remove one of them and run Diagnostics --> Memory Test-Quick. 2. If the problem does not recur, return the DIMM to its place, remove the other one, and run the test again. 3. If the test does not detect the error, run Diagnostics --> Memory Test-Full. 1. Turn on the computer and check the air turbulence at the louver near the PC Card slot. 2. Run Diagnostics --> Other Devices --> Fan. If the TrackPoint does not work, check the configuration as specified in the ThinkPad Configuration program. If the TrackPoint is disabled, select Automatic to enable it. After you use the TrackPoint, the pointer may drift on the screen for a short time. This drift can occur when a slight, steady pressure is applied to the TrackPoint pointer. This symptom is not a hardware problem. If the pointer stops after a short time, no service action is necessary. Touch Pad If enabling the TrackPoint does not correct the problem, continue with the following: v Interactive Tests --> Mouse If the Touch Pad does not work, check the configuration as specified in the ThinkPad Configuration program. If the Touch Pad is disabled, select Automatic to enable it. If enabling the Touch Pad does not correct the problem, continue with the following: v Interactive Tests --> Mouse Fn key combinations The following table shows the function of each combination of Fn with a function key. Key combination Fn+F1 Fn+F2 Fn+F3 Description Reserved. Reserved. Turn off the computer display, leaving the screen blank. To turn the computer display on again, press any key or press the TrackPoint pointing stick. (continued) 54 T40/T40p, T41/T41p, T42/T42p
-
 1
1 -
2
-
3
-
4
-
5
-
6
-
7
-
8
-
9
-
10
-
11
-
12
-
13
-
14
-
15
-
16
-
17
-
18
-
19
-
20
-
21
-
22
-
23
-
24
-
25
-
26
-
27
-
28
-
29
-
30
-
31
-
32
-
33
-
34
-
35
-
36
-
37
-
38
-
39
-
40
-
41
-
42
-
43
-
44
-
45
-
46
-
47
-
48
-
49
-
50
-
51
-
52
-
53
-
54
-
 55
55 -
 56
56 -
 57
57 -
 58
58 -
 59
59 -
 60
60 -
 61
61 -
 62
62 -
 63
63 -
 64
64 -
 65
65 -
66
-
67
-
68
-
69
-
70
-
71
-
72
-
73
-
74
-
75
-
76
-
77
-
78
-
79
-
80
-
81
-
82
-
83
-
84
-
85
-
86
-
87
-
88
-
89
-
90
-
91
-
92
-
93
-
94
-
95
-
96
-
97
-
98
-
99
-
100
-
101
-
102
-
103
-
104
-
105
-
106
-
107
-
108
-
109
-
110
-
111
-
112
-
113
-
114
-
115
-
116
-
117
-
118
-
119
-
120
-
121
-
122
-
123
-
124
-
125
-
126
-
127
-
128
-
129
-
130
-
131
-
132
-
133
-
134
-
135
-
136
-
137
-
138
-
139
-
140
-
141
-
142
-
143
-
144
-
145
-
146
-
147
-
148
-
149
-
150
-
151
-
152
-
153
-
154
-
155
-
156
-
157
-
158
-
159
-
160
-
161
-
162
-
163
-
164
-
165
-
166
-
167
-
168
-
169
-
170
-
171
-
172
-
173
-
174
-
175
-
176
-
177
-
178
-
179
-
180
-
181
-
182
-
183
-
184
-
185
-
186
-
187
-
188
-
189
-
190
-
191
-
192
-
193
-
194
-
195
-
196
-
197
-
198
-
199
-
200
-
201
-
202
-
203
-
204
-
205
-
206
-
207
-
208
-
209
-
210
-
211
-
212
-
213
-
214
-
215
-
216
-
217
-
218
-
219
-
220
-
221
-
222
-
223
-
224
-
225
-
226
-
227
-
228
-
229
-
230
-
231
-
232
-
233
-
234
-
235
-
236
-
237
-
238
-
239
-
240
-
241
-
242
-
243
-
244
-
245
-
246
-
247
-
248
-
249
-
250
-
251
-
252
-
253
-
254
-
255
-
256
-
257
-
258
-
259
-
260
 |
 |
