Lenovo ThinkPad i Series 172x ThinkPad 390 / i Series 1720 models Hardware Mai - Page 71
Power Latch, IR Board, and DC-DC & BATT Board
 |
View all Lenovo ThinkPad i Series 172x manuals
Add to My Manuals
Save this manual to your list of manuals |
Page 71 highlights
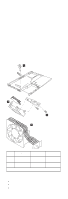
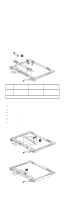
1. Remove the screw securing the fan ASM. Lift the fan ASM up to remove. 2. Remove the two screws securing the fan ASM. 3. Remove the mylar from the fan ASM. Step Size (Quantity) Head & Color Torque 1 M2 x 4L (1) Flat head, silver 1.6 kgf-cm 2 M2.5 x 3.5L Flat head, (2) black 1.6 kgf-cm Note: Make sure you use the correct screw for replacement. Power Latch, IR Board, and DC-DC & BATT Board "Battery ASM" on page 49 "Hard Disk Drive" on page 49 "Combo Bay" on page 50 ThinkPad 390/i Series 1700 63
-
 1
1 -
2
-
3
-
4
-
5
-
6
-
7
-
8
-
9
-
10
-
11
-
12
-
13
-
14
-
15
-
16
-
17
-
18
-
19
-
20
-
21
-
22
-
23
-
24
-
25
-
26
-
27
-
28
-
29
-
30
-
31
-
32
-
33
-
34
-
35
-
36
-
37
-
38
-
39
-
40
-
41
-
42
-
43
-
44
-
45
-
46
-
47
-
48
-
49
-
50
-
51
-
52
-
53
-
54
-
55
-
56
-
57
-
58
-
59
-
60
-
61
-
62
-
63
-
64
-
65
-
 66
66 -
 67
67 -
 68
68 -
 69
69 -
 70
70 -
 71
71 -
 72
72 -
 73
73 -
 74
74 -
 75
75 -
 76
76 -
77
-
78
-
79
-
80
-
81
-
82
-
83
-
84
-
85
-
86
-
87
-
88
-
89
-
90
-
91
-
92
-
93
-
94
-
95
-
96
-
97
-
98
-
99
-
100
-
101
 |
 |

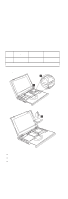
1.
Remove the screw securing the fan ASM. Lift the fan
ASM up to remove.
2.
Remove the two screws securing the fan ASM.
3.
Remove the mylar from the fan ASM.
Step
Size (Quan-
tity)
Head &
Color
Torque
1
M2 x 4L (1)
Flat head,
silver
1.6 kgf-cm
2
M2.5 x 3.5L
(2)
Flat head,
black
1.6 kgf-cm
Note:
Make sure you use the correct screw for replacement.
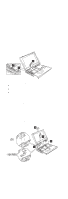
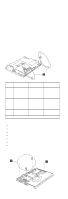
Power Latch, IR Board, and DC-DC &
BATT Board
±
“Battery ASM” on page
49
±
“Hard Disk Drive” on page
49
±
“Combo Bay” on page
50
ThinkPad 390/i Series 1700
63