Lexmark B2236 Users Guide PDF - Page 22
Exporting or importing a configuration file, Networking, Connecting the printer to a Wi-Fi network
 |
View all Lexmark B2236 manuals
Add to My Manuals
Save this manual to your list of manuals |
Page 22 highlights
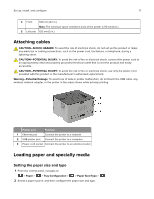
Set up, install, and configure 22 3 Browse to the flash file. 4 Click Upload. Exporting or importing a configuration file You can export the configuration settings of your printer into a text file, and then import the file to apply the settings to other printers. 1 Open a web browser, and then type the printer IP address in the address field. Notes: • View the printer IP address on the printer home screen. The IP address appears as four sets of numbers separated by periods, such as 123.123.123.123. • If you are using a proxy server, then temporarily disable it to load the web page correctly. 2 From the Embedded Web Server, click Export Configuration or Import Configuration. 3 Follow the instructions on the screen. 4 If the printer supports applications, then do the following: a Click Apps > select the application > Configure. b Click Export or Import. Networking Connecting the printer to a Wi‑Fi network Make sure that Active Adapter is set to Auto. From the control panel, navigate to > Network Overview > > Active Adapter > > Auto > > Network/Ports > Using the control panel 1 From the control panel, navigate to: > Network/Ports > > Wireless > > Setup On Printer Panel > 2 Select a Wi‑Fi network, and then enter the network password. Note: For Wi‑Fi‑network‑ready printer models, a prompt to set up the Wi‑Fi network appears during initial setup. Using Lexmark Mobile Assistant 1 Depending on your mobile device, download the Lexmark Mobile Assistant application from either the Google PlayTM store or App Store online store. 2 From the control panel, navigate to: > Network/Ports > > Wireless > > Setup Using Mobile App > 3 Follow the instructions on the display to view the printer ID. Note: The printer ID is the printer wireless network SSID.
-
 1
1 -
2
-
3
-
4
-
5
-
6
-
7
-
8
-
9
-
10
-
11
-
12
-
13
-
14
-
15
-
16
-
 17
17 -
 18
18 -
 19
19 -
 20
20 -
 21
21 -
 22
22 -
 23
23 -
 24
24 -
 25
25 -
 26
26 -
 27
27 -
28
-
29
-
30
-
31
-
32
-
33
-
34
-
35
-
36
-
37
-
38
-
39
-
40
-
41
-
42
-
43
-
44
-
45
-
46
-
47
-
48
-
49
-
50
-
51
-
52
-
53
-
54
-
55
-
56
-
57
-
58
-
59
-
60
-
61
-
62
-
63
-
64
-
65
-
66
-
67
-
68
-
69
-
70
-
71
-
72
-
73
-
74
-
75
-
76
-
77
-
78
-
79
-
80
-
81
-
82
-
83
-
84
-
85
-
86
-
87
-
88
-
89
-
90
-
91
-
92
-
93
-
94
-
95
-
96
-
97
-
98
-
99
-
100
-
101
-
102
-
103
-
104
-
105
-
106
-
107
-
108
-
109
-
110
-
111
-
112
-
113
-
114
-
115
-
116
-
117
-
118
-
119
-
120
-
121
-
122
-
123
-
124
 |
 |
