Lexmark E238 Service Manual - Page 130
Print quality service checks, Using print quality test s
 |
View all Lexmark E238 manuals
Add to My Manuals
Save this manual to your list of manuals |
Page 130 highlights
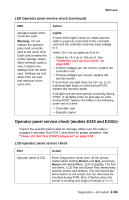
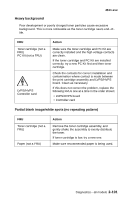
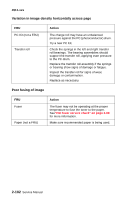
4511-xxx Print quality service checks Note: Ensure cover closes tightly. A gap in the opening may allow light to expose the photoconductor resulting in a 'dirty' print. Extreme environmental conditions, temperatures, and humidity will affect the print quality. Using print quality test pages To help isolate print quality problems, like streaking, print test pages using the print quality test pages. Models E238, E240, and E240n To print the print quality test pages: 1. Enter Configuration Menu. a. Turn off the printer. b. Open the front access cover. c. Turn on the printer while pressing and holding . d. When light stays on, close cover. e. Wait (approximately 10 seconds) until the printer drive activates. 2. Slowly press and release come on. three times until the and lights 3. Press and hold test pages. until all the lights flash to initiate printing the quality Four pages print to help you evaluate print quality. The first page has various fonts and a graphic, the second page is gray with graphics, the third page is black, and the last page is blank. Once the paper exits into the output bin, the printer returns to the home state (four top lights on). 4. Use the test pages to isolate problems such as light or toner streaks. See "POST symptom table" on page 2-79 for solutions to these problems. To exit print quality test pages, turn the printer off. Models E340 and E342n To print the print quality test pages: 1. Enter Configuration Menu. a. Turn the printer off. b. Press and hold Select and Return. c. Turn the printer on. d. Release the buttons when Performing Self Test displays. 2. Select Prt Quality Pgs. 2-98 Service Manual
-
 1
1 -
2
-
3
-
4
-
5
-
6
-
7
-
8
-
9
-
10
-
11
-
12
-
13
-
14
-
15
-
16
-
17
-
18
-
19
-
20
-
21
-
22
-
23
-
24
-
25
-
26
-
27
-
28
-
29
-
30
-
31
-
32
-
33
-
34
-
35
-
36
-
37
-
38
-
39
-
40
-
41
-
42
-
43
-
44
-
45
-
46
-
47
-
48
-
49
-
50
-
51
-
52
-
53
-
54
-
55
-
56
-
57
-
58
-
59
-
60
-
61
-
62
-
63
-
64
-
65
-
66
-
67
-
68
-
69
-
70
-
71
-
72
-
73
-
74
-
75
-
76
-
77
-
78
-
79
-
80
-
81
-
82
-
83
-
84
-
85
-
86
-
87
-
88
-
89
-
90
-
91
-
92
-
93
-
94
-
95
-
96
-
97
-
98
-
99
-
100
-
101
-
102
-
103
-
104
-
105
-
106
-
107
-
108
-
109
-
110
-
111
-
112
-
113
-
114
-
115
-
116
-
117
-
118
-
119
-
120
-
121
-
122
-
123
-
124
-
 125
125 -
 126
126 -
 127
127 -
 128
128 -
 129
129 -
 130
130 -
 131
131 -
 132
132 -
 133
133 -
 134
134 -
 135
135 -
136
-
137
-
138
-
139
-
140
-
141
-
142
-
143
-
144
-
145
-
146
-
147
-
148
-
149
-
150
-
151
-
152
-
153
-
154
-
155
-
156
-
157
-
158
-
159
-
160
-
161
-
162
-
163
-
164
-
165
-
166
-
167
-
168
-
169
-
170
-
171
-
172
-
173
-
174
-
175
-
176
-
177
-
178
-
179
-
180
-
181
-
182
-
183
-
184
-
185
-
186
-
187
-
188
-
189
-
190
-
191
-
192
-
193
-
194
-
195
-
196
-
197
-
198
-
199
-
200
-
201
-
202
-
203
-
204
-
205
-
206
-
207
-
208
-
209
-
210
-
211
-
212
-
213
-
214
-
215
-
216
-
217
-
218
-
219
-
220
-
221
-
222
-
223
-
224
-
225
-
226
-
227
-
228
-
229
-
230
-
231
-
232
-
233
-
234
-
235
-
236
-
237
-
238
-
239
-
240
-
241
-
242
-
243
-
244
-
245
-
246
-
247
-
248
-
249
-
250
-
251
-
252
-
253
-
254
-
255
-
256
-
257
-
258
-
259
 |
 |
