Lexmark E260 Service Manual - Page 152
Right side cover assembly removal, Remove the screw B from the bottom right side of the printer.
 |
View all Lexmark E260 manuals
Add to My Manuals
Save this manual to your list of manuals |
Page 152 highlights
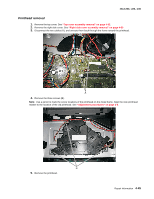
4513-200, -220, -230 Right side cover assembly removal Note: Leave the front cover closed when removing the right side cover assembly. 1. Remove the one screw (A) from behind the paper tray. A 2. Remove the screw (B) from the bottom right side of the printer. B 4-50 Lexmark™ E260, E260d, E260dn
-
 1
1 -
2
-
3
-
4
-
5
-
6
-
7
-
8
-
9
-
10
-
11
-
12
-
13
-
14
-
15
-
16
-
17
-
18
-
19
-
20
-
21
-
22
-
23
-
24
-
25
-
26
-
27
-
28
-
29
-
30
-
31
-
32
-
33
-
34
-
35
-
36
-
37
-
38
-
39
-
40
-
41
-
42
-
43
-
44
-
45
-
46
-
47
-
48
-
49
-
50
-
51
-
52
-
53
-
54
-
55
-
56
-
57
-
58
-
59
-
60
-
61
-
62
-
63
-
64
-
65
-
66
-
67
-
68
-
69
-
70
-
71
-
72
-
73
-
74
-
75
-
76
-
77
-
78
-
79
-
80
-
81
-
82
-
83
-
84
-
85
-
86
-
87
-
88
-
89
-
90
-
91
-
92
-
93
-
94
-
95
-
96
-
97
-
98
-
99
-
100
-
101
-
102
-
103
-
104
-
105
-
106
-
107
-
108
-
109
-
110
-
111
-
112
-
113
-
114
-
115
-
116
-
117
-
118
-
119
-
120
-
121
-
122
-
123
-
124
-
125
-
126
-
127
-
128
-
129
-
130
-
131
-
132
-
133
-
134
-
135
-
136
-
137
-
138
-
139
-
140
-
141
-
142
-
143
-
144
-
145
-
146
-
 147
147 -
 148
148 -
 149
149 -
 150
150 -
 151
151 -
 152
152 -
 153
153 -
 154
154 -
 155
155 -
 156
156 -
 157
157 -
158
-
159
-
160
-
161
-
162
-
163
-
164
-
165
-
166
-
167
-
168
-
169
-
170
-
171
-
172
-
173
-
174
-
175
-
176
-
177
-
178
-
179
-
180
 |
 |

4-50
Lexmark™ E260, E260d, E260dn
4513-200, -220, -230
Right side cover assembly removal
Note:
Leave the front cover closed when removing the right side cover assembly.
1.
Remove the one screw (A) from behind the paper tray.
2.
Remove the screw (B) from the bottom right side of the printer.
A
B