Lexmark OptraImage SC 1275 Service Manual - Page 102
Lexmark OptraImage SC 1275 Manual
 |
View all Lexmark OptraImage SC 1275 manuals
Add to My Manuals
Save this manual to your list of manuals |
Page 102 highlights
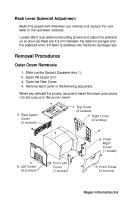
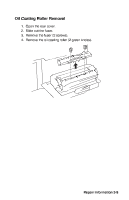
Rack Lever Solenoid Adjustment Make this adjustment whenever you remove and replace the rack lever or the rack lever solenoid. Loosen the 3 rack solenoid mounting screws and adjust the solenoid up or down so there are 4.5 mm between the solenoid plunger and the solenoid when the lever is detented into the toner cartridge rack. Removal Procedures Outer Cover Removals 1. 2. 3. 4. Slide out the Second Cassette (tray 1). Open the Upper Unit. Open the Rear Cover. Remove each cover in the following sequence. When you reinstall the covers, be sure to insert the cover protrusions into the cutouts in the printer frame. Repair Information 3-5
-
 1
1 -
2
-
3
-
4
-
5
-
6
-
7
-
8
-
9
-
10
-
11
-
12
-
13
-
14
-
15
-
16
-
17
-
18
-
19
-
20
-
21
-
22
-
23
-
24
-
25
-
26
-
27
-
28
-
29
-
30
-
31
-
32
-
33
-
34
-
35
-
36
-
37
-
38
-
39
-
40
-
41
-
42
-
43
-
44
-
45
-
46
-
47
-
48
-
49
-
50
-
51
-
52
-
53
-
54
-
55
-
56
-
57
-
58
-
59
-
60
-
61
-
62
-
63
-
64
-
65
-
66
-
67
-
68
-
69
-
70
-
71
-
72
-
73
-
74
-
75
-
76
-
77
-
78
-
79
-
80
-
81
-
82
-
83
-
84
-
85
-
86
-
87
-
88
-
89
-
90
-
91
-
92
-
93
-
94
-
95
-
96
-
 97
97 -
 98
98 -
 99
99 -
 100
100 -
 101
101 -
 102
102 -
 103
103 -
 104
104 -
 105
105 -
 106
106 -
 107
107 -
108
-
109
-
110
-
111
-
112
-
113
-
114
-
115
-
116
-
117
-
118
-
119
-
120
-
121
-
122
-
123
-
124
-
125
-
126
-
127
-
128
-
129
-
130
-
131
-
132
-
133
-
134
-
135
-
136
-
137
-
138
-
139
-
140
-
141
-
142
-
143
-
144
-
145
-
146
-
147
-
148
-
149
-
150
-
151
-
152
-
153
-
154
-
155
-
156
-
157
-
158
-
159
-
160
-
161
-
162
-
163
-
164
-
165
-
166
-
167
-
168
-
169
-
170
-
171
-
172
-
173
-
174
-
175
-
176
-
177
-
178
-
179
-
180
-
181
-
182
-
183
-
184
-
185
-
186
-
187
-
188
-
189
-
190
-
191
-
192
-
193
-
194
-
195
-
196
-
197
-
198
-
199
-
200
-
201
-
202
-
203
-
204
-
205
-
206
-
207
-
208
-
209
 |
 |

Repair Information 3-5
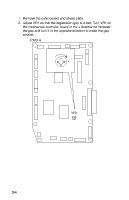
Rack Lever Solenoid Adjustment
Make this adjustment whenever you remove and replace the rack
lever or the rack lever solenoid.
Loosen the 3 rack solenoid mounting screws and adjust the solenoid
up or down so there are 4.5 mm between the solenoid plunger and
the solenoid when the lever is detented into the toner cartridge rack.
Removal Procedures
Outer Cover Removals
1.
Slide out the Second Cassette (tray 1).
2.
Open the Upper Unit.
3.
Open the Rear Cover.
4.
Remove each cover in the following sequence.
When you reinstall the covers, be sure to insert the cover protrusions
into the cutouts in the printer frame.