Lexmark OptraImage SC 1275 Service Manual - Page 122
Lexmark OptraImage SC 1275 Manual
 |
View all Lexmark OptraImage SC 1275 manuals
Add to My Manuals
Save this manual to your list of manuals |
Page 122 highlights
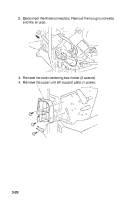
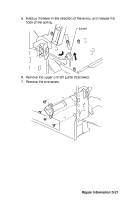
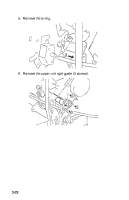
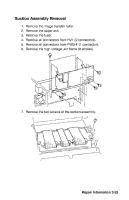
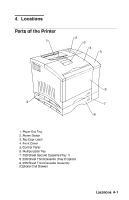
Suction Assembly Removal 1. 2. 3. 4. 5. 6. Remove the image transfer roller. Remove the paper exit. Remove the fuser. Remove all connectors from HV1 (9 connectors). Remove all connectors from PWB-F (1 connector). Remove the high voltage unit frame (8 screws). 7. Remove the two screws of the suction assembly. Repair Information 3-25
-
 1
1 -
2
-
3
-
4
-
5
-
6
-
7
-
8
-
9
-
10
-
11
-
12
-
13
-
14
-
15
-
16
-
17
-
18
-
19
-
20
-
21
-
22
-
23
-
24
-
25
-
26
-
27
-
28
-
29
-
30
-
31
-
32
-
33
-
34
-
35
-
36
-
37
-
38
-
39
-
40
-
41
-
42
-
43
-
44
-
45
-
46
-
47
-
48
-
49
-
50
-
51
-
52
-
53
-
54
-
55
-
56
-
57
-
58
-
59
-
60
-
61
-
62
-
63
-
64
-
65
-
66
-
67
-
68
-
69
-
70
-
71
-
72
-
73
-
74
-
75
-
76
-
77
-
78
-
79
-
80
-
81
-
82
-
83
-
84
-
85
-
86
-
87
-
88
-
89
-
90
-
91
-
92
-
93
-
94
-
95
-
96
-
97
-
98
-
99
-
100
-
101
-
102
-
103
-
104
-
105
-
106
-
107
-
108
-
109
-
110
-
111
-
112
-
113
-
114
-
115
-
116
-
 117
117 -
 118
118 -
 119
119 -
 120
120 -
 121
121 -
 122
122 -
 123
123 -
 124
124 -
 125
125 -
 126
126 -
 127
127 -
128
-
129
-
130
-
131
-
132
-
133
-
134
-
135
-
136
-
137
-
138
-
139
-
140
-
141
-
142
-
143
-
144
-
145
-
146
-
147
-
148
-
149
-
150
-
151
-
152
-
153
-
154
-
155
-
156
-
157
-
158
-
159
-
160
-
161
-
162
-
163
-
164
-
165
-
166
-
167
-
168
-
169
-
170
-
171
-
172
-
173
-
174
-
175
-
176
-
177
-
178
-
179
-
180
-
181
-
182
-
183
-
184
-
185
-
186
-
187
-
188
-
189
-
190
-
191
-
192
-
193
-
194
-
195
-
196
-
197
-
198
-
199
-
200
-
201
-
202
-
203
-
204
-
205
-
206
-
207
-
208
-
209
 |
 |

Repair Information 3-25
Suction Assembly Removal
1.
Remove the image transfer roller.
2.
Remove the paper exit.
3.
Remove the fuser.
4.
Remove all connectors from HV1 (9 connectors).
5.
Remove all connectors from PWB-F (1 connector).
6.
Remove the high voltage unit frame (8 screws).
7.
Remove the two screws of the suction assembly.