Lexmark X340 User's Guide - Page 14
Getting the MFP ready to fax, Connecting directly to a telephone wall jack - printer
 |
View all Lexmark X340 manuals
Add to My Manuals
Save this manual to your list of manuals |
Page 14 highlights
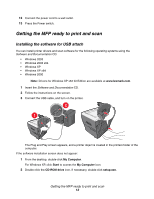
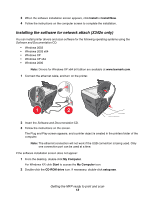
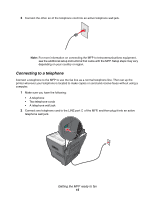
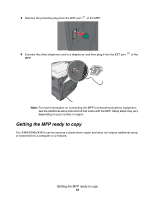
3 When the software installation screen appears, click Install or Install Now. Follow the instructions on the computer screen to complete the installation. Getting the MFP ready to fax You can connect the printer to equipment such as a telephone, an answering machine, or a computer modem. If problems occur, see Setup troubleshooting on page 72. Note: The printer is an analog device that works best when directly connected to the wall jack. Other devices (such as a telephone or answering machine) can be successfully attached to pass through the printer, as described in the setup steps. If you want a digital connection such as ISDN, DSL, or ADSL, a third-party device (such as a DSL filter) is required. You do not need to attach the printer to a computer, but you do need to connect it to a telephone line to send and receive faxes. You can connect the printer to other equipment. See the following table to determine the best way to set up the printer. Connecting directly to a telephone wall jack CAUTION: Use only a 26 AWG or larger telecommunications (RJ-11) cord when connecting this product to the public switched telephone network. Connect the MFP directly to a telephone wall jack to make copies or send and receive faxes without using a computer. 1 Make sure you have a telephone cord and a telephone wall jack. 2 Connect one end of the telephone cord into the LINE port of the MFP. Getting the MFP ready to fax 14
-
 1
1 -
2
-
3
-
4
-
5
-
6
-
7
-
8
-
 9
9 -
 10
10 -
 11
11 -
 12
12 -
 13
13 -
 14
14 -
 15
15 -
 16
16 -
 17
17 -
 18
18 -
 19
19 -
20
-
21
-
22
-
23
-
24
-
25
-
26
-
27
-
28
-
29
-
30
-
31
-
32
-
33
-
34
-
35
-
36
-
37
-
38
-
39
-
40
-
41
-
42
-
43
-
44
-
45
-
46
-
47
-
48
-
49
-
50
-
51
-
52
-
53
-
54
-
55
-
56
-
57
-
58
-
59
-
60
-
61
-
62
-
63
-
64
-
65
-
66
-
67
-
68
-
69
-
70
-
71
-
72
-
73
-
74
-
75
-
76
-
77
-
78
-
79
-
80
-
81
-
82
-
83
-
84
-
85
-
86
-
87
-
88
-
89
-
90
-
91
-
92
-
93
-
94
-
95
-
96
-
97
-
98
-
99
-
100
-
101
-
102
-
103
-
104
-
105
 |
 |