Lexmark X340 User's Guide - Page 88
Scan troubleshooting, Lexmark X340/X340n/X342n - scanner driver
 |
View all Lexmark X340 manuals
Add to My Manuals
Save this manual to your list of manuals |
Page 88 highlights
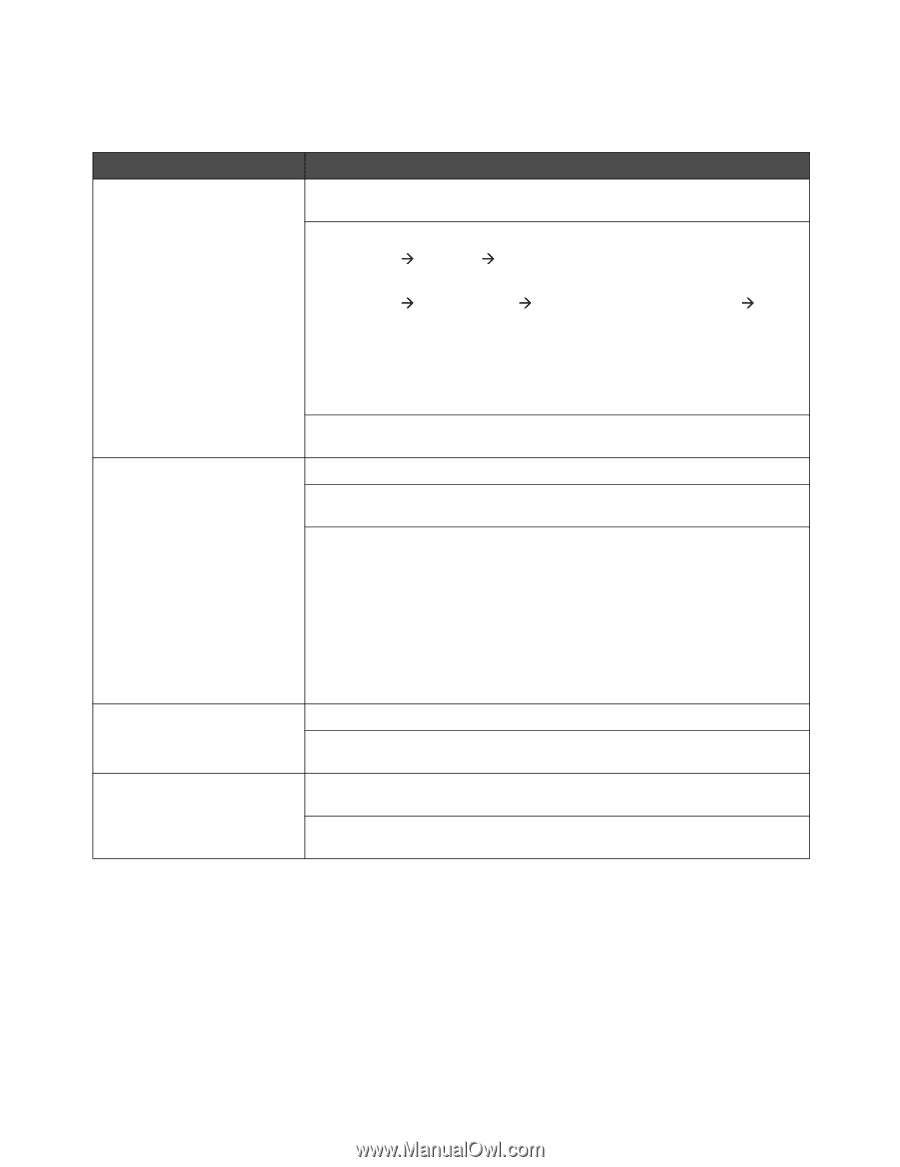
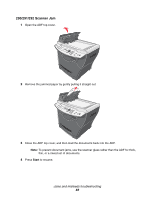
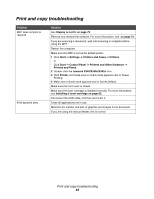
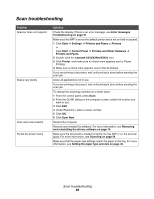
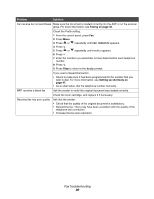
Scan troubleshooting Problem Scanner does not respond Scans very slowly Scan was unsuccessful. Partial document scans Solution Check the display. If there is an error message, see Error messages troubleshooting on page 91. Make sure the MFP is set as the default printer and is not on hold or paused. 1 Click Start Æ Settings Æ Printers and Faxes or Printers. or Click Start Æ Control Panel Æ Printers and Other Hardware Æ Printers and Faxes. 2 Double-click the Lexmark X340/X340n/X342n icon. 3 Click Printer, and make sure no check mark appears next to Pause Printing. 4 Make sure a check mark appears next to Set As Default. If you are printing a document, wait until printing is done before sending the scan job. Close all applications not in use. If you are printing a document, wait until printing is done before sending the scan job. To change the scanning resolution to a lower value: 1 From the control panel, press Scan. 2 From the QLINK dialog on the computer screen, select the location you want to use. 3 Click Edit. 4 Under Resolution, select a lower number. 5 Click OK. 6 Click Scan Now. Restart the computer. Remove and reinstall the software. For more information, see Removing and reinstalling the drivers software on page 74. Make sure the document is loaded correctly into the ADF or on the scanner glass. For more information, see Scanning on page 54. Make sure that the paper size settings match the paper in the tray. For more information, see Setting the paper type and size on page 35. Scan troubleshooting 88
-
 1
1 -
2
-
3
-
4
-
5
-
6
-
7
-
8
-
9
-
10
-
11
-
12
-
13
-
14
-
15
-
16
-
17
-
18
-
19
-
20
-
21
-
22
-
23
-
24
-
25
-
26
-
27
-
28
-
29
-
30
-
31
-
32
-
33
-
34
-
35
-
36
-
37
-
38
-
39
-
40
-
41
-
42
-
43
-
44
-
45
-
46
-
47
-
48
-
49
-
50
-
51
-
52
-
53
-
54
-
55
-
56
-
57
-
58
-
59
-
60
-
61
-
62
-
63
-
64
-
65
-
66
-
67
-
68
-
69
-
70
-
71
-
72
-
73
-
74
-
75
-
76
-
77
-
78
-
79
-
80
-
81
-
82
-
 83
83 -
 84
84 -
 85
85 -
 86
86 -
 87
87 -
 88
88 -
 89
89 -
 90
90 -
 91
91 -
 92
92 -
 93
93 -
94
-
95
-
96
-
97
-
98
-
99
-
100
-
101
-
102
-
103
-
104
-
105
 |
 |