Lexmark X642E Advanced Manual - Page 10
Overview, Install SafeCom Go Lexmark - downloads
 |
UPC - 734646258746
View all Lexmark X642E manuals
Add to My Manuals
Save this manual to your list of manuals |
Page 10 highlights
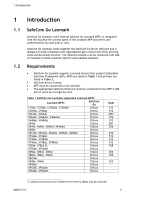
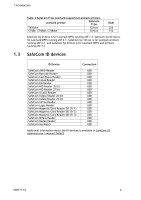
2 SafeCom Go Lexmark 2 SafeCom Go Lexmark 2.1 2.2 Overview Complete SafeCom G3 Server software installation as described in SafeCom Smart Printing Administrator's Quick Guide D10600. 1. SafeCom Go Lexmark software installation (2.2). Note: For devices with SafeCom Go Lexmark 012xxx software, proceed to step 4 (skip steps 2 & 3). 2. Add the SafeCom Security Template (2.3). 3. Edit access control (2.3.2). 4. Show/hide icons on the control panel (2.3.3). 5. Install optional card reader (2.3.4). Install SafeCom Go Lexmark 1. Make sure the printer is powered on and ready. 2. Start SafeCom Administrator and login to the server. 3. Browse to Add device in the Devices menu, System overview, or in SafeCom Assistant. 4. Enter the Printer address. Click Next. Printer address: 5. The device sends its details to the SafeCom Administrator. Click Next. 6. On the Settings tab, select device Capabilities, including support of Duplex and Color. 7. Click Add to register the device in the SafeCom solution. 7a. Right-click the device and click Update software... 8. Click Send to send the SafeCom Go Lexmark software file (*.fls) to the device. You may need to download the file first (see 2.5.1). 9. Click Close when download is completed. 10. After 2-5 minutes the printer's control panel will say Ready and after another 2-3 minutes the printer has loaded the SafeCom Go application. 10a. Open the Configuration web page (2.4.2) and specify the SafeCom server (2.5.2). Alternatively install the SafeCom Go Lexmark software via a web browser: 1. Open a web browser and enter the IP address of the printer in the address field. Use of JavaScript (Active Scripting) must be enabled. 2. Click Settings on the menu. 3. In the Other Settings list click Embedded Solutions. D60711-14 10
-
 1
1 -
2
-
3
-
4
-
 5
5 -
 6
6 -
 7
7 -
 8
8 -
 9
9 -
 10
10 -
 11
11 -
 12
12 -
 13
13 -
 14
14 -
 15
15 -
16
-
17
-
18
-
19
-
20
-
21
-
22
-
23
-
24
-
25
-
26
-
27
-
28
-
29
-
30
-
31
-
32
-
33
-
34
-
35
-
36
-
37
-
38
-
39
-
40
-
41
-
42
-
43
-
44
-
45
-
46
 |
 |
