Linksys WVC54GCA-RM User Guide - Page 8
Setting Up and Mounting the Camera - help
 |
UPC - 745883582280
View all Linksys WVC54GCA-RM manuals
Add to My Manuals
Save this manual to your list of manuals |
Page 8 highlights
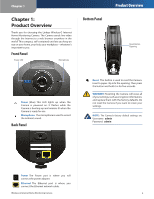
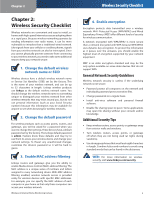
Chapter 3 6. Plug the included power adapter into the Camera's Power port. Plug the other end into an electrical outlet. Click Next. Setting Up and Mounting the Camera If the Camera you want is not displayed, click Search Again to run a new search for Cameras. Otherwise, in the Camera List box, click the name of the Camera you are installing. Write down the Camera's IP address shown in the Status box, so you can use it to access the Web-based Utility later. Click Next. 9. Enter a name for the Camera. Memorable names are helpful, especially if you are using multiple Cameras on the same network. It should have 15 characters or fewer. After you have entered the name, click Next. Power On the Camera 7. Make sure the LED is lit on the Camera's front panel. If it is not lit, make sure the cables are properly connected to the Camera. Click Next. Assign the Camera Name 10. Select how to assign an IP Address to the Camera, either automatically or manually. Then click Next. Check the LED 8. The Wizard searches for the Wireless-G Internet Home Monitoring Camera on your network, then displays the Camera found along with status information. Camera Found on Network Wireless-G Internet Home Monitoring Camera IP Address Settings •• Automatically obtain an IP Address Select this option if you want to automatically assign an IP address to the Camera using DHCP. If you are not sure which option to choose, Linksys recommends this option. •• Set IP address configuration manually Select this option if you want to manually assign a static IP address to the Camera. If you select this option, fill in the IP Address, Subnet Mask, and Gateway fields. 7
-
 1
1 -
2
-
 3
3 -
 4
4 -
 5
5 -
 6
6 -
 7
7 -
 8
8 -
 9
9 -
 10
10 -
 11
11 -
 12
12 -
 13
13 -
14
-
15
-
16
-
17
-
18
-
19
-
20
-
21
-
22
-
23
-
24
-
25
-
26
-
27
-
28
-
29
-
30
-
31
-
32
-
33
-
34
-
35
-
36
-
37
-
38
-
39
-
40
-
41
-
42
-
43
-
44
-
45
-
46
-
47
-
48
-
49
-
50
-
51
-
52
 |
 |
