Logitech 904360-0403 Manual - Page 3
Connecting the Receiver - mouse
 |
UPC - 097855010162
View all Logitech 904360-0403 manuals
Add to My Manuals
Save this manual to your list of manuals |
Page 3 highlights
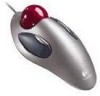
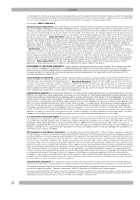
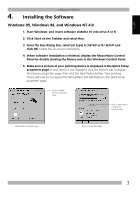
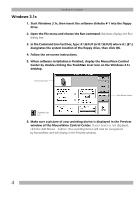
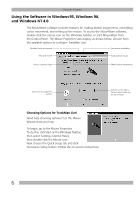
English Connecting the Receiver 1. Connecting the Receiver TrackMan® Live!™ works in Windows® 3.1x, Windows® 95, Windows® 98, and Windows NT® 4.0. Enjoy all the great features of TrackMan Live! (according to the platform) in these popular operating systems. TrackMan Live! uses digital radio technology. Communication between TrackMan Live! and your computer is achieved with great reliability using radio waves. TrackMan Live! does not have a bulky cable that can get in the way, nor does it use infrared technology, which often requires line-of-sight placement and usage. Instead, TrackMan Live! emits radio frequencies as a means of communicating, which are picked up by the receiver and passed on to your computer. The receiver is connected to your computer via a single cable that plugs into your computer's PS/2 port. A 9-pin serial port adapter is provided should you need to connect this cable to your computer's serial port. CAUTION: Before installing the receiver's cable, turn off your computer. Plugging or unplugging cables to your computer's PS/2 port can damage the PS/2 port or your computer. 1. For a PS/2 mouse port installation only, turn off the computer. 2. Connect the receiver to the computer's PS/2 6-pin mouse port or its 9-pin serial port using a 9-pin adapter. PS/2 6-pin mouse port 9-pin serial port When using a 9-pin adapter, connect the adapter to the computer port, tighten the thumb screws, and connect Attaching the 9-pin adapter the data cable to the adapter. Be sure to line up the arrows on both the cable and the adapter. 3. For a PS/2 mouse port installation only, turn on the computer. 1
-
 1
1 -
 2
2 -
 3
3 -
 4
4 -
 5
5 -
 6
6 -
 7
7 -
 8
8 -
 9
9 -
10
-
11
-
12
-
13
-
14
-
15
-
16
-
17
-
18
-
19
-
20
-
21
-
22
-
23
-
24
-
25
-
26
-
27
-
28
-
29
-
30
-
31
-
32
-
33
-
34
-
35
-
36
-
37
-
38
-
39
-
40
-
41
-
42
-
43
-
44
-
45
-
46
-
47
-
48
-
49
-
50
-
51
-
52
-
53
-
54
-
55
-
56
-
57
-
58
-
59
-
60
-
61
-
62
-
63
-
64
-
65
-
66
-
67
-
68
-
69
-
70
-
71
-
72
-
73
-
74
-
75
-
76
-
77
-
78
-
79
-
80
 |
 |