Logitech HD Powerline 200a Powerline Network Utility Help File - Page 9
Before Starting, STEP 1: Write down the security key from Logitech Alert Commander
 |
View all Logitech HD Powerline 200a manuals
Add to My Manuals
Save this manual to your list of manuals |
Page 9 highlights
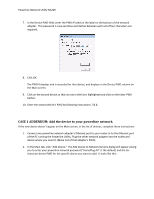
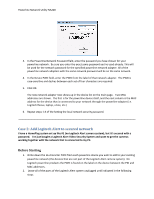
Powerline Network Utility NA200 Before Starting 1. Write down the 16-character PWD from the powerline device you wish to add to your existing powerline network (the devices that are not part of the Logitech Alert camera system). On Logitech powerline products the PWD is found on the label on the device between the PID and MAC addresses. 2. Plug in the HD 200a network adapter into the outlet and device where you need it. 3. Run the Powerline Utility on the PC that is running Logitech Alert Commander. STEP 1: Write down the security key from Logitech Alert Commander Because you use the Logitech Alert Video Security System and Cameras, and you have set a security key for your Alert camera system, the Alert security key is your powerline network password. 1. Launch the Alert Commander app on your PC. 2. Go to Settings > Security and Web > Advanced and write down the security key in the Secure Local Camera Network checkbox. 3. Exit Alert Commander properly. STEP 2: Add the device to your powerline network 1. On the Main tab, click "Add Device." The new Logitech devices will not appear in the main list. The Add Device to Network Devices dialog will appear, asking you to enter your powerline network password and the 16-character device PWD for the specific device you want to add. It looks like this: 2. In the Powerline Network Password field, enter the password you have chosen for your powerline network. This will be used for the network password for the specified powerline network adapters. All of the powerline network adapters with the same network password will be on the same network.
-
 1
1 -
2
-
3
-
 4
4 -
 5
5 -
 6
6 -
 7
7 -
 8
8 -
 9
9 -
 10
10 -
 11
11 -
 12
12 -
 13
13 -
 14
14 -
15
 |
 |
