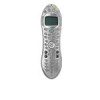
Logitech Harmony 680 User Manual
Logitech Harmony 680 Manual
 |
View all Logitech Harmony 680 manuals
Add to My Manuals
Save this manual to your list of manuals |
Logitech Harmony 680 manual content summary:
- Logitech Harmony 680 | User Manual - Page 1
information in this manual may be out of date. If in doubt, follow the information and instructions on the web site. Select a topic from the following list to learn more about your Harmony remote: INTRODUCTION • Getting to Know Your Harmony Remote SETTING UP YOUR HARMONY REMOTE • Before You Begin - Logitech Harmony 680 | User Manual - Page 2
-labeled button for an Activity: ! Add a custom-labeled button to send a command to more than one device at a time: • Teaching Infrared (IR) Commands ! Using the Infrared Sensor ! Naming an Infrared Command ADDITIONAL HELP ! Finding Answers to Your Questions ! Troubleshooting Your Harmony Remote - Logitech Harmony 680 | User Manual - Page 3
The Harmony remote is an Internet-powered universal remote control. Your Harmony remote can control most devices that understand infrared (IR) signals. The configuration of your Harmony remote is simple: • Answer web wizard questions to create your own personal Harmony remote configuration - Logitech Harmony 680 | User Manual - Page 4
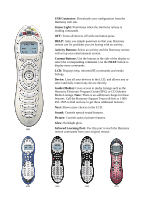
in the LCD, and allows you to select and fully control any device directly. • Guide (Media): Gives access to media listings such as the Harmony Electronic Program Guide (EPG) or CD Jukebox Media Listings. Note: There is an additional charge for these features. Call the Harmony Support Team toll - Logitech Harmony 680 | User Manual - Page 5
all the information, take your current remote controls and the worksheet to your computer. Step 3: Install the Harmony Software Windows Users The minimum recommended Windows™ system configuration requirements are: • IBM compatible PC with USB plug and play support • Microsoft Windows 98SE/Me/2000/XP - Logitech Harmony 680 | User Manual - Page 6
click the Mac folder and then click the Harmony remote Software.mpkg icon. e. Follow the online instructions to complete the software installation. f. After the software installation completes, the Harmony remote application will automatically start and the Harmony icon will be displayed in the Dock - Logitech Harmony 680 | User Manual - Page 7
your personal configuration. The Harmony remote provides you with several features to guide you through the setup and customization process: Tool Location Description Example Online web wizards Harmony web site Provides instructional Adding a Device help to guide the user through a series - Logitech Harmony 680 | User Manual - Page 8
entertainment devices for you. 1. Turn off all your entertainment devices manually or using the original remote controls. 2. Use the Activity buttons on your Harmony remote to choose an activity you would like to try. 3. If your Harmony remote did not turn on the correct devices for the activity - Logitech Harmony 680 | User Manual - Page 9
to one of your favorite activities, or press the More Activities button to see other activities in the LCD. 2. Select the activity you want to switch to by pressing the button next to it, or press More Activities. Resynchronizing Your Harmony Remote From time to time when you select an activity, the - Logitech Harmony 680 | User Manual - Page 10
features. For example, if you have chosen your Stereo Receiver to control the sound in your Watch a DVD Activity, the Sound mode will change the Harmony remote buttons to control the Stereo Receiver as completely as possible. In the LCD you will see commands such as Surround Field or Bass+. Press - Logitech Harmony 680 | User Manual - Page 11
your activities. For example, you can put commands on the LCD or customize specific buttons for the commands. See Customizing Your Harmony Remote. At any time, press the DEVICE button to switch into this mode. Once in Device mode, the Harmony remote will display a list of all the devices you have in - Logitech Harmony 680 | User Manual - Page 12
Television" to "Watch Cable" and the other to "Watch Satellite".) Customizing the Activity Buttons The Harmony remote gives you dedicated buttons for selecting activities. The Harmony remote will automatically set these buttons so you can start each of your activities. However, you can choose the - Logitech Harmony 680 | User Manual - Page 13
how each of your devices is controlled, the Harmony remote will make its best effort to match all the buttons you need to control an activity. However, there may be some commands you want to add to buttons or display on the LCD. Commands can be added to buttons quickly and easily by customizing any - Logitech Harmony 680 | User Manual - Page 14
-down list in each of the required device columns next to the name of the button you want to set. 2. Add as many custom-labeled buttons as you like. Click More Custom Labels to add labels one at a time. 3. When you update your Harmony remote, click NEXT to view all of your custom-labeled - Logitech Harmony 680 | User Manual - Page 15
connector. The Harmony remote uses this sensor to learn commands from original device remotes. The following steps outline what happens when you press a button on your original remote control: 1. The infrared sensor on the Harmony remote learns the infrared signal. 2. The Harmony remote uploads it - Logitech Harmony 680 | User Manual - Page 16
what you have connected to your device, rather name it based on what it is called on the front of the device, or on the remote control (e.g. InputAux, InputVideo1, InputTape, InputDVD, InputVCR). - Logitech Harmony 680 | User Manual - Page 17
Harmony remote: Tool Location Description Example Troubleshooter Harmony web site A web wizard that Not applicable. helps you diagnose and resolve the problem you are having. If you cannot find the answer to your question(s) or troubleshoot your problem(s), contact your Harmony Support
-
 1
1 -
 2
2 -
 3
3 -
 4
4 -
 5
5 -
 6
6 -
 7
7 -
8
-
9
-
10
-
11
-
12
-
13
-
14
-
15
-
16
-
17
 |
 |

Harmony Remote User Manual
600 Series
Congratulations on the purchase of your Harmony remote! True system control is now at your
fingertips. This User Manual will introduce you to the basic setup, customizations and main features of
your Harmony remote.
The Harmony remote web site and web wizards are constantly updated to improve your experience. At
times the information in this manual may be out of date. If in doubt, follow the information and
instructions on the web site. Select a topic from the following list to learn more about your Harmony
remote:
INTRODUCTION
•
Getting to Know Your Harmony Remote
SETTING UP YOUR HARMONY REMOTE
•
Before You Begin the Online Setup Process
!
Step 1: Unpack and prepare the remote.
!
Step 2: Complete the Entertainment Device Worksheet
!
Step 3: Install the Harmony Software
•
Begin the Setup Process
!
Step 1: Create your Harmony Login
!
Step 2: Complete the Online Setup Process
!
Step 3: Synchronize Your Harmony Remote
USING YOUR HARMONY REMOTE
•
Selecting an Activity
•
Switching Between Activities
•
Resynchronizing Your Harmony Remote
•
Using Sound and Picture Modes in an Activity
!
Sound Mode
!
Picture Mode
•
Using Device Mode