MSI P55A User Guide - Page 97
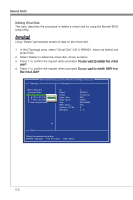
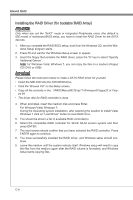
The creation is done. The virtual disk is now listed in [Topology] pane, as shown
 |
View all MSI P55A manuals
Add to My Manuals
Save this manual to your list of manuals |
Page 97 highlights
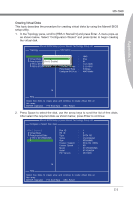
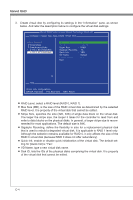
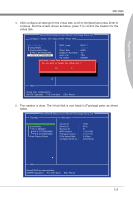
Appendix C MS-7668 4. After configure all settings for the virtual disk, scroll to the [Next] and press Enter to continue. And the screen shows as below, press Y to confirm the creation for the virtual disk. Marvell BIOS Setup (c) xxxx Marvell Technology Group Ltd. Configure -> Select free disks Create Virtual Disk HBA 0: Marvell 0 RAID Level : RAID 1 Virtual Disks PD ID : 1987739 Free physical Disks Stripe Size : 64KB * PD 0: ST3750330MS Gigabyte Rounding : 1G * PD 8: ST3750330MS Quick Init : YES VD Name : MRAID1 Create Virtual DiskCurrent Speed : 08 Do you want to crNeaetxet this virtual disk ? Yes No Help Virtual disk configurations. ENTER: Operation F10: Exit/ Save ESC: Return 5. The creation is done. The virtual disk is now listed in [Topology] pane, as shown below. Marvell BIOS Setup (c) xxxx Marvell Technology Group Ltd. Topology Information HBA 0: Marvell 0 Virtual Disks VD 0: MRAID1 PD 0: ST3750330MS PD 8: ST3750330MS Free Physical Disks Vendor ID : Device ID : Revision ID : BIOS Version : Firmware Version : PCIe Speed Rate : Configure SATA as : 1848 91xx 81 1.0.0.1008 2.1.0.1316 5.0Gbps AHCI Mode Help Marvell RAID on chip controller. ENTER: Operation F10: Exit/ Save ESC: Return C-5
-
 1
1 -
2
-
3
-
4
-
5
-
6
-
7
-
8
-
9
-
10
-
11
-
12
-
13
-
14
-
15
-
16
-
17
-
18
-
19
-
20
-
21
-
22
-
23
-
24
-
25
-
26
-
27
-
28
-
29
-
30
-
31
-
32
-
33
-
34
-
35
-
36
-
37
-
38
-
39
-
40
-
41
-
42
-
43
-
44
-
45
-
46
-
47
-
48
-
49
-
50
-
51
-
52
-
53
-
54
-
55
-
56
-
57
-
58
-
59
-
60
-
61
-
62
-
63
-
64
-
65
-
66
-
67
-
68
-
69
-
70
-
71
-
72
-
73
-
74
-
75
-
76
-
77
-
78
-
79
-
80
-
81
-
82
-
83
-
84
-
85
-
86
-
87
-
88
-
89
-
90
-
91
-
 92
92 -
 93
93 -
 94
94 -
 95
95 -
 96
96 -
 97
97 -
 98
98 -
 99
99 -
 100
100 -
 101
101 -
 102
102
 |
 |
