MSI Z170A SLI User Manual - Page 39
EZ Mode, CPU Fan Fail Warning Control
 |
View all MSI Z170A SLI manuals
Add to My Manuals
Save this manual to your list of manuals |
Page 39 highlights
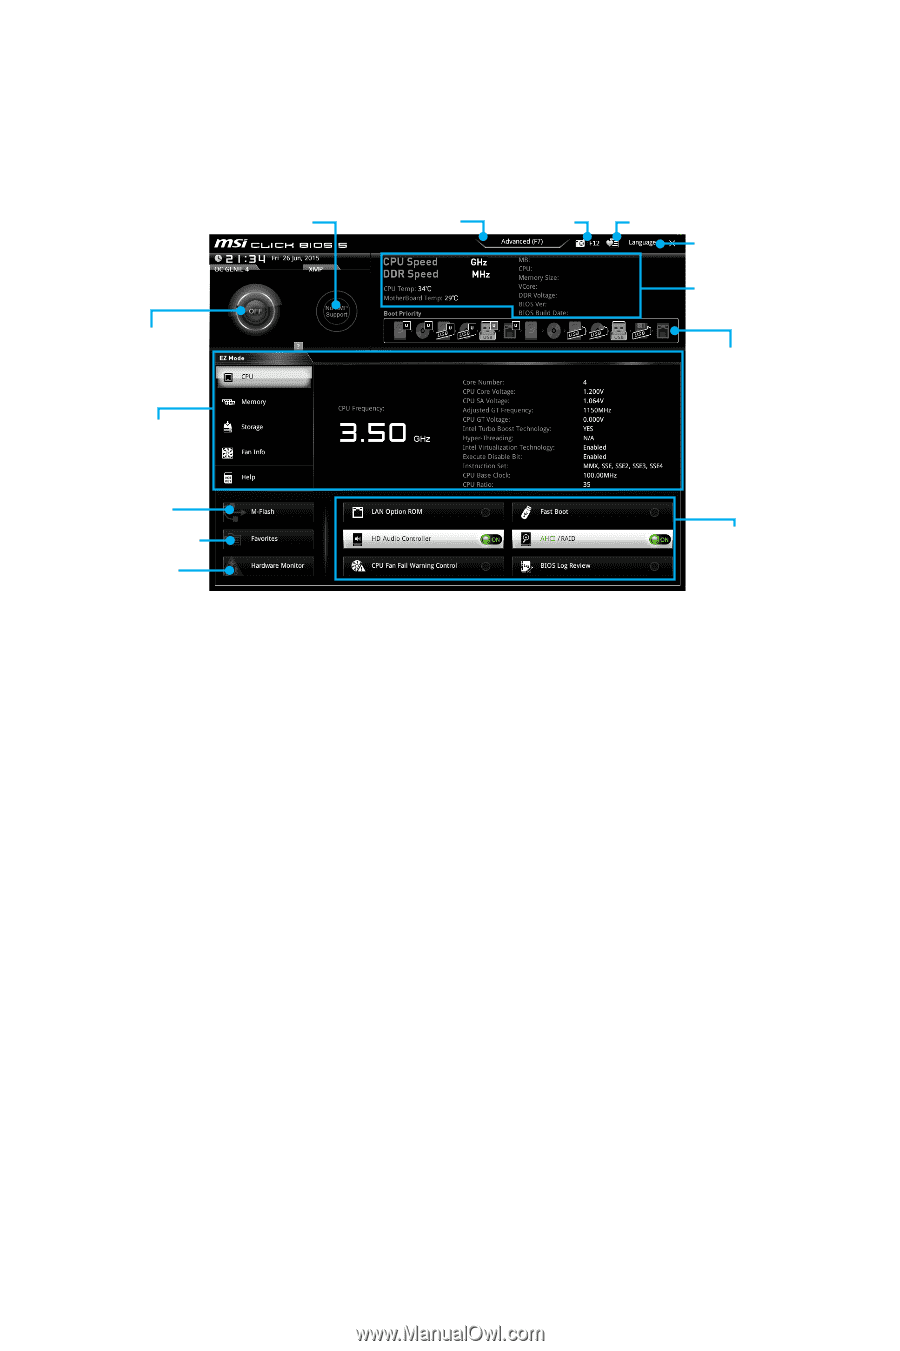
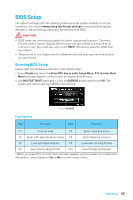
EZ Mode At EZ mode, it provides the basic system information and allows you to configure the basic setting. To configure the advanced BIOS settings, please enter the Advanced Mode by pressing the Setup Mode switch or F7 function key. XMP switch Setup Mode switch Screenshot Favorites Language System information OC GENIE 4 toggle Boot device priority bar Information display M-Flash Favorites Hardware Monitor Function buttons y Function buttons - enable or disable the LAN Option ROM, Fast Boot, HD audio controller, AHCI, RAID, CPU Fan Fail Warning Control and BIOS Log Review by clicking on their respective button. y Hardware Monitor - click on this button to display the Hardware Monitor menu that allows you to manually control the fan speed by percentage. y M-Flash - click on this button to display the M-Flash menu that provides the way to update BIOS with a USB flash drive. y Information display - click on the CPU, Memory, Storage, Fan Info and Help buttons on left side to display related information. y Boot device priority bar - you can move the device icons to change the boot priority. The boot priority from high to low is left to right. y System information - shows the CPU/ DDR speed, CPU/ MB temperature, MB/ CPU type, memory size, CPU/ DDR voltage, BIOS version and build date. y Language - allows you to select the language of BIOS setup. y Screenshot - press this tab or the F12 key to take a screenshot and save it to USB flash drive (FAT/ FAT32 format only). y Setup Mode switch - press this tab or the F7 key to switch between Advanced mode and EZ mode. y XMP switch - click on the inner circle to enable/ disable the X.M.P. (Extreme Memory Profile). Switch the outer circle to select the X.M.P. profile. This switch will only be available if the X.M.P. supported memory module is installed. BIOS Setup 39
-
 1
1 -
2
-
3
-
4
-
5
-
6
-
7
-
8
-
9
-
10
-
11
-
12
-
13
-
14
-
15
-
16
-
17
-
18
-
19
-
20
-
21
-
22
-
23
-
24
-
25
-
26
-
27
-
28
-
29
-
30
-
31
-
32
-
33
-
 34
34 -
 35
35 -
 36
36 -
 37
37 -
 38
38 -
 39
39 -
 40
40 -
 41
41 -
 42
42 -
 43
43 -
 44
44 -
45
-
46
-
47
-
48
-
49
-
50
-
51
-
52
-
53
-
54
-
55
-
56
-
57
-
58
-
59
-
60
-
61
-
62
-
63
-
64
-
65
-
66
-
67
-
68
-
69
-
70
-
71
-
72
-
73
-
74
-
75
-
76
-
77
-
78
-
79
-
80
-
81
-
82
 |
 |