MSI Z170A SLI User Manual - Page 77
Failed Hard Drive Member, Ctrl + I, Enter, Intel, Rapid Storage Technology, Rebuild to this Disk
 |
View all MSI Z170A SLI manuals
Add to My Manuals
Save this manual to your list of manuals |
Page 77 highlights
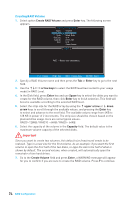
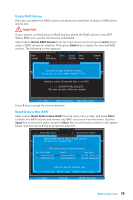
3. Reboot to Windows®; the rebuild will occur automatically. Failed Hard Drive Member 1. Power off. 2. Replace the failed hard drive with a new one that is of equal or greater capacity. 3. Reboot the system to IRST Option ROM by press Ctrl + I keys during the POST. 4. Select the port of the destination disk for rebuilding, and then press Enter. [ MAIN MENU ] 1. 2. Create Delete RAID RAID VVoolluu[mmDeeEGRADED VOLUME 4. Recovery DE4T. ECTREeDco]very Volume Volume Options Options "Degraded" volume and disk ava5i.lableEfxoirt rebuilding detected. Selecting a disk initiates a reb[ uiDldI.SRKe/bVuOildLUcMomEpINleFteOsRinMAthTeIOoNper]ating system. RAID VolumeSs e: lect the port of the destination disk for rebuilding (ESC to exit): None defined. Port Drive Model Serial # Size Physical De1vices X: XXX-XXXXXXXX XXXXXXXXXXXXXX XXX.XGB Port Device Model Serial # Size Type/Status (Vol ID) 1 XXXX-XXXXXXXX XXXXXXXXXXXXXX XXX.XGB Non-RAID Disk 2 XXXX-XXXXXX[ X↑X↓] - PreXviXouXsX/XNXeXxXt XX[XEXNXTXER] - Select XX[EXS.XCG]B- ExNiton-RAID Disk [ ↑↓] - Select [ESC] - Exit [ENTER] - Select Menu 5. Exit IRST Option ROM, reboot to Windows®. 6. When prompted to rebuild the RAID volume, click Yes. 7. The Intel® Rapid Storage Technology application will be launched. Right-click the new hard drive and select Rebuild to this Disk. The Rebuild Wizard will be launched which guide you through the process of rebuilding to the new hard drive. RAID Configuration 77
-
 1
1 -
2
-
3
-
4
-
5
-
6
-
7
-
8
-
9
-
10
-
11
-
12
-
13
-
14
-
15
-
16
-
17
-
18
-
19
-
20
-
21
-
22
-
23
-
24
-
25
-
26
-
27
-
28
-
29
-
30
-
31
-
32
-
33
-
34
-
35
-
36
-
37
-
38
-
39
-
40
-
41
-
42
-
43
-
44
-
45
-
46
-
47
-
48
-
49
-
50
-
51
-
52
-
53
-
54
-
55
-
56
-
57
-
58
-
59
-
60
-
61
-
62
-
63
-
64
-
65
-
66
-
67
-
68
-
69
-
70
-
71
-
 72
72 -
 73
73 -
 74
74 -
 75
75 -
 76
76 -
 77
77 -
 78
78 -
 79
79 -
 80
80 -
 81
81 -
 82
82
 |
 |
