MSI Z170A SLI User Manual - Page 74
Creating RAID Volume
 |
View all MSI Z170A SLI manuals
Add to My Manuals
Save this manual to your list of manuals |
Page 74 highlights
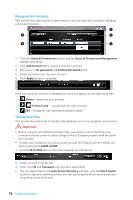
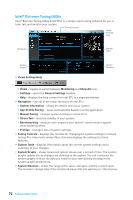
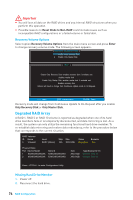
Creating RAID Volume 1. Select option Create RAID Volume and press Enter key. The following screen appears. [ CREATE VOLUME MENU ] Name : RAID Level : Disks : Strip Size : Capacity : Sync : Volume0 RAID1(Mirror) Select Disks N / A XXX.X GB N / A Create Volume [ HELP ] RAID 1 : Mirrors data (redundancy) . [ ↑↓] - Change [TAB] - Next [ESC] - Previous Menu [ENTER] - Select 2. Specify a RAID Volume name and then press the Tab or Enter key to go to the next field. 3. Use the arrow keys to select the RAID level best suited to your usage model in RAID Level. 4. In the Disk field, press Enter key and use Space key to select the disks you want to create for the RAID volume, then click Enter key to finish selection. This field will become available according to the selected RAID level. 5. Select the strip size for the RAID array by using the ↑ upper arrow or ↓ down arrow keys to scroll through the available values, and pressing the Enter key to select and advance to the next field. The available values range from 4KB to 128 KB in power of 2 increments. The strip size should be chosen based on the planned drive usage. Here are some typical values: RAID0 -128KB / RAID10 - 64KB / RAID5 - 64KB. 6. Select the capacity of the volume in the Capacity field. The default value is the maximum volume capacity of the selected disks. Important Since you want to create two volumes, this default size (maximum) needs to be reduced. Type in a new size for the first volume. As an example: if you want the first volume to span the first half of the two disks, re-type the size to be half of what is shown by default. The second volume, when created, will automatically span the remainder of two hard drives. 7. Go to the Create Volume field and press Enter, a WARNING message will appear for you to confirm if you are sure to create the RAID volume. Press Y to continue. 74 RAID Configuration
-
 1
1 -
2
-
3
-
4
-
5
-
6
-
7
-
8
-
9
-
10
-
11
-
12
-
13
-
14
-
15
-
16
-
17
-
18
-
19
-
20
-
21
-
22
-
23
-
24
-
25
-
26
-
27
-
28
-
29
-
30
-
31
-
32
-
33
-
34
-
35
-
36
-
37
-
38
-
39
-
40
-
41
-
42
-
43
-
44
-
45
-
46
-
47
-
48
-
49
-
50
-
51
-
52
-
53
-
54
-
55
-
56
-
57
-
58
-
59
-
60
-
61
-
62
-
63
-
64
-
65
-
66
-
67
-
68
-
 69
69 -
 70
70 -
 71
71 -
 72
72 -
 73
73 -
 74
74 -
 75
75 -
 76
76 -
 77
77 -
 78
78 -
 79
79 -
80
-
81
-
82
 |
 |
