Mackie DFX 12 Owner's Manual - Page 11
Aux 1 Return Inputs, CD/Tape Input, Tape Output, EFX Footswitch, AC Power Input, Power Switch - sound mixer
 |
View all Mackie DFX 12 manuals
Add to My Manuals
Save this manual to your list of manuals |
Page 11 highlights
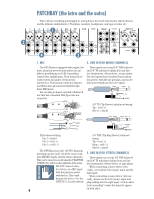
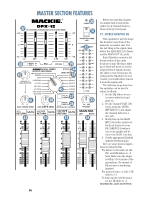
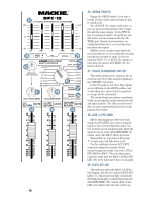
9. AUX 1 RETURN INPUTS Patch the outputs of external parallel effects devices to these inputs. Signals coming in are adjusted using the AUX 1 RETURN (43) fader and MUTE. When connecting a mono device (just one cord), always use the left (mono) input and plug nothing into the right input. The signal will appear on both sides. 10. AUX 2 RETURN INPUTS Patch the outputs of external parallel effects devices to these inputs. Signals coming in are adjusted using the AUX 2 RETURN (40) fader and MUTE. When connecting a mono device (just one cord), always use the left (mono) input and plug nothing into the right input. The signal will appear on both sides. Note: The AUX 2 RETURN signal is combined with the signal from the internal effects processor. 11. CD/TAPE INPUT Patch the outputs of your intermission entertainment here. Any line-level mono or stereo device can be used: tape, DVD/CD player, television audio, etc. Signals coming into the CD/TAPE (11) inputs are adjusted using the CD/TAPE RETURN (35) fader and MUTE. Also see page 16 for information regarding the BREAK (36) switch. SLEEVE TIP SLEEVE TIP RCA unbalanced wiring: Tip = hot, sleeve = shield When connecting a mono device (just one cord), you'll need a "Y-splitter" RCA adapter. It turns a mono output cord into two cords; so both the left and right tape input jacks can be used. This adapter is widely available. Note: There is a chance of feedback if you have the ins and outs connected to the same recorder, and it is in record mode. 12. TAPE OUTPUT Use these jacks to capture the entire performance to tape. The signal at these jacks is the main mix, but it is not affected by the position of the MAIN MIX (34) faders. If you find that the output to tape is quite low in level, but your main speaker sound levels are good, you might try turning down the level controls of your amplifiers a little. Adjust the channel faders upwards to compensate. This will increase the levels in the mixer and the tape output. 13. EFX FOOTSWITCH You can connect a normally-open footswitch here to switch the EMAC effects processor in and out. Closing the switch connection causes the internal effects to be bypassed, as you bask in the warm glow of the BYPASS LED (44). Note: This only affects the internal effects and does not affect any signals from devices plugged into AUX 1 and AUX 2 returns. SLEEVE SLEEVE TIP TIP TIP SLEEVE 1/4" TS (Tip-Sleeve) Footswitch wiring: Tip = one end of a normally-open switch Sleeve = shield, and other end of a normally-open switch. 14. AC POWER INPUT This IEC socket on the rear panel, is where you connect the supplied AC linecord to provide AC power to POWER the mixer. Plug the cord into a suitable AC outlet, properly grounded and capable of delivering adequate current. The mixer has a universal-input, switching power supply, so you can plug the AC linecord into any AC outlet with a nominal voltage between 100 and 240 VAC, without having to worry about setting any switches or using a step-up or step-down voltage transformer. 15. POWER SWITCH Push the side of the switch labeled "ON" to turn the mixer on; you should see the POWER LED (30) glow in confirmation on the top right of the mixer. To turn the mixer off, push the switch the other way. As a general rule, turn the mixer on first, before any amplifiers or powered speakers, and at the end of a show, turn it off last. This will prevent any turn-on or turn-off thumps being heard in your speakers. ON 100 240 VAC, 50/60 Hz, 30 WATTS 11
-
 1
1 -
2
-
3
-
4
-
5
-
 6
6 -
 7
7 -
 8
8 -
 9
9 -
 10
10 -
 11
11 -
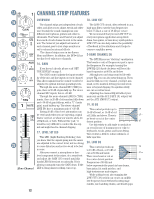 12
12 -
 13
13 -
 14
14 -
 15
15 -
 16
16 -
17
-
18
-
19
-
20
-
21
-
22
-
23
-
24
 |
 |
