Mackie DFX 12 Owner's Manual - Page 5
Make The Connections, Set The Levels, Tweak The Mix, Know These Things - channel
 |
View all Mackie DFX 12 manuals
Add to My Manuals
Save this manual to your list of manuals |
Page 5 highlights
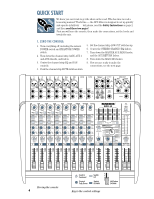
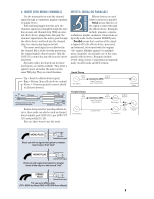
2. MAKE THE CONNECTIONS: 4. TWEAK THE MIX: 1. Connect your amplifier's outputs to your speaker inputs (unless, of course, you have powered monitors). 2. Plug all the sound system components into suitable AC outlets, properly grounded and capable of delivering adequate current. 3. Using XLR or 1/4" TRS cables, make connections from your mixer's MAIN OUT to your amplification system's line inputs. 4. Make connections from your microphones and instruments to the mixer: Connect balanced microphones to the mono channel MIC jacks. (For condenser microphones, engage the PHANTOM POWER switch, located just above the meters). Connect line-level instruments (synthesizers, guitar effects, direct boxes) to the mono or stereo channel LINE IN 1/4" TRS jacks. 5. ZERO THE CONSOLE as shown on the previous page. 6. Turn all the power switches on, leaving the amplifier's switch for last. 7. Turn up the MAIN MIX faders to the "-30" label, for now. We'll crank it later on. 8. Now you are ready to set the levels: 3. SET THE LEVELS: 1. Engage MUTE on all channels except your rhythm section (drums & bass). 2. Adjust the rhythm section's channel faders to get a good balance of levels. 3. Un-mute the other active channels and adjust their faders. 4. Now that you have a rough mix going, turn up the MAIN MIX faders to a comfortable listening level. 5. If the overall mix has an equalization problem, make adjustments to the STEREO GRAPHIC EQ. If an individual channel is the problem, use its channel EQ instead. 6. Use the channel AUX 2/EFX knobs to send signals to the EMAC internal effects processor (and to any external effects processor you might have). Then adjust the AUX 2/EFX RETURN fader and experiment with adding some effects to your main mix. 7. If you are playing into the CD/TAPE input, try using the VOCAL ELIMINATOR to hear its effect on centered vocals and start up a bit of audience mass-Karaoke. 8. Depending on how much time you've got, keep tweaking. Walk the room to see how it sounds away from your mixer. Keep tweaking. 1. Choose one of the microphones or instruments you connected. Make some noise. If KNOW THESE THINGS: it's a microphone, sing at your normal • Never listen to loud singing volume. If it's a synthesizer, play it music for prolonged at its normal output level. periods. Please see "Safety 2. While making noise, turn up that channel's GAIN control until the adjacent LEVEL SET LED starts a-blinking. Instructions" on page 2 for information on hearing protection. 3. Disengage (up) that channel's MUTE. 4. Raise that channel's fader to unity gain ("U" label). You should be hearing your noise now. • Never plug amplifier outputs into anything except speakers. • Never use guitar cables to connect amplifiers to speakers. 5. If necessary, apply channel EQ changes. (You may need to compensate for level changes with the channel fader.) 6. Check that the channel's OL LED does not come on. If it does, reset the GAIN and adjust the EQ if required. 7. Repeat steps 1 through 6 for the remaining active channels. 8. Stop making noise. Everyone: start making music. 9. Now you are ready to tweak the mix: • Before making connections to an external amp or reconfiguring an amp's routing, turn the amp's level (gain) controls down, turn the power off, make the changes, turn the power back on, and then turn the level controls back up. • When you shut down your equipment, turn off any external amplifiers first. When powering up, turn on the amplifiers last. • Change your engine oil every 3,000 miles and rotate your tires for even wear. Dad would be proud of you. • Save the shipping box and packing material! You may need them someday, and you probably don't want to have to pay for that again. 5
-
 1
1 -
 2
2 -
 3
3 -
 4
4 -
 5
5 -
 6
6 -
 7
7 -
 8
8 -
 9
9 -
 10
10 -
 11
11 -
12
-
13
-
14
-
15
-
16
-
17
-
18
-
19
-
20
-
21
-
22
-
23
-
24
 |
 |
